


إظهار 184 نتيجة مطابقة
ج: نعم، تم تصميم بعض طرازات XPG لتدعم جميع المعايير الرئيسية للموصلات العكسية، بما في ذلك ASUS BTF وGIGABYTE PROJECT STEALTH وMSI PROJECT ZERO.
مؤخرًا، أكدنا التوافق مع اللوحات الأم الجديدة من GIGABYTE.
يمكن أن يدعم PRIME BOX ما يصل إلى 4 توصيلات مروحة PWM لكل موزع، بتيار إجمالي يصل إلى 1 أمبير في كل منفذ، و90 مصباح LED لكل قناة ARGB LED، بتيار إجمالي يصل إلى 2 أمبير لكل منفذ. ومع ذلك، نوصي بتحديد الحد الأقصى للسحب بإجمالي 8 أمبير من موصل الطاقة SATA.
إذا لم تتمكن من رؤية مقاييس الحرارة في شريط التحكم الحراري, فيرجى غلق برنامج XPG PRIME وإعادة تشغيله من خلال النقر بزر الماوس الأيمن على التطبيق وتحديد خيار "التشغيل كمسؤول". من المفترض أن يجعل ذلك شاشة الحرارة تظهر بشكل سليم.
إذا قمت بتوصيل مكونات ARGB مع أعداد مختلفة من LED بموزع واحد وتود تخصيص إعدادات لكل LED, يرجى تحديد "model > customized" وإدخال أكبر عدد من LED في الصندوق الفارغ أسفل خيار "number of LEDs" ("عدد LED). ثم قم بتشغيل وضع "اللوحة" ويمكنك التحكم في كل LED على حدة.
يعد برنامج PRIME ضروريًا لضبط الإضاءة. لديك 3 خيارات لضبط مؤثرات الإضاءة:
1. شاشة قاعة العرض:
اختر خيارات الإضاءة المسبقة الضبط المفضلة لديك. ستتم مزامنة كل مكونات ARGB مع مؤثر الإضاءة المحدد معًا.
2. قسم إضاءة الأجهزة المتصلة:
في قسم الإضاءة, يمكنك تخصيص الإضاءة المسبقة الضبط لكل منفذ ARGB.
3. وضع اللوحة:
بإمكانك إنشاء مؤثر إضاءة مخصص لكل LED.
تظهر حاليًا على بعض شرائح AMD الأحدث مشكلة في طريقة تعاملها مع واجهة الأجهزة البينية (HID.dll) بشكل مختلف عن المنصات الأخرى. وهذه الواجهة مطلوبة بواسطة وضع اللوحة للتعامل مع كل LED بشكل مستقل من أجل تقديم مؤثرات الإضاءة المعقدة المصممة بواسطة المستخدم مباشرةً. وقد تم تصعيد هذه المشكلة وهي قيد البحث. ونتوقع أن يحل الإصدار المستقبلي من مشغل شريحة AMD الشاملة هذه المشكلة وسيتم تحديث هذه البيانات فور توفر الحل. يرجى ملاحظة أن هذه المشكلة لا تؤثر على كل من القائمة الرئيسة وقائمة ""الأجهزة المتصلة"", لذا لا يزال PRIME BOX يتمتع بكامل وظيفته على منصات AMD من أجل الإدارة الحرارية والتحكم في الإضاءة.
XPG PRIME software offers 1 main functions: to set up Lighting, Performance and to determine the power usage preference in Power Status tab.
User can quickly change the lighting effect with presets, or advance to more detailed settings such as individual lighting sectors and brightness on the mouse.
The original launch version of the XPG SUMMONER firmware did not support software controls aside what was preprogrammed via key shortcuts. That changed with the release of firmware update v1003. Now, you're no longer required to remember cumbersome shortcuts to record macros or assign static colors via profiles. This is because all such functions are now handled via the XPG PRIME ecosystem management software.
- XPG PRIME provides several ways to assign lighting effects with different levels of customization; including the ability to design your own effects per each LED, or instantly apply changes to the entire color layout with simple one-click selection options.
- It provides a highly customizable Macro Editor, enabling users to create up to 50 sets of macros and bind each one to 128 different keys.
- You can also now customize your own shortcuts. Please note that all available default non-customized keyboard shortcuts are highlighted on the keyboard when you hold down the function (fn) key.
Click the following link to download the latest available version of XPG PRIME ecosystem management software.
For detailed information about upgrading to Windows 11, please visit the Microsoft Website.
According to the definition of Power Delivery, the output of Type-C must be 10-100W. Notebooks with Thunderbolt 3 or higher specifications can support 5V/3A PD charging.
All Xenia laptops are pre-activated at the factory during production. There is a known Microsoft issue that has been resolved when running by updating to the latest Cunulative Update via Windows Update function from Control Panel.
Japanese manufacturers are a leader in the development of new water-based electrolyte systems with enhanced conductivity; and they produce the most reliable and best-performing products.
We build our own memory modules, starting from cutting wafers and all the way through packaging and board mounting. For XPG Xenia we handpicked only the best parts of wafers to put in your notebook.
We do try to provide the best possible configuration to future-proof your notebook. However, there is an unpopulated M.2 SSD slot in the unit that can be used to increase storage capacity. You can check the Quick Start Guide provided with the unit for installation instructions. If you add a second drive, you could also decide to implement Raid 0 mode via BIOS setting in the advanced menu, but Raid configurations are more error prone so make sure you have constant backups.
Preinstalled SO-DIMM memory modules can also be replaced as well for future upgrades. BIOS currently could also support 64GB in 2x32Gb configuration if you wish.
Note: Any damages or issues caused during installation or as a result of incompatible parts being used is not covered under warranty and may void the coverage. XPG will not be liable for any damage from or to third-party components that you may install, and cannot guarantee compatibility or performance aside from adhering to industry standards.
WIFI 6 offers greatly reduced latency (up to 75% reduction) when connecting, and increased gigabit speeds up to ~1700 Mbps when paired with compatible wireless routers that supports 802.11ax and 160Mhz channel bandwidth. Those speeds may vary greatly based on local traffic, your internet provider’s bandwidth and the wireless router itself.
As with the vast majority of Gaming Notebooks, XPG XENIA is designed to maximize performance, therefore it is not recommended to be used directly on your lap. While our touch temperatures are within range of safety, it is still recommended to avoid direct contact and it is suggested to use a base in between instead, especially for longer period or when operating under Performance Mode, as XPG XENIA may get uncomfortably hot. Additionally, consider that air intakes at the bottom of your device should not be blocked at all time, as reducing cooling airflow may push the device to be warmer and even trigger a shut down if not enough fresh air is drawn in to cool the system.
If your system does not turn on after installing the power supply, please follow the troubleshooting guide listed below:
1. Make sure the AC main power cord is connected to your PC correctly.
2. Please make sure the AC source is switched On
3. Please make sure the AC On/Off switch on the back panel of the power supply unit in the “I” (On) position.
4. Please make sure the MB & CPU Power Socket & connectors are connected correctly on the Motherboard.
5. If you still have problem turning on your PC, please contact ADATA Tech Support, Service Center or your local dealer.
.NEVER, under any circumstances, open the power supply unit or attempt to repair the power supply yourself. This is extremely dangerous due to the high voltage.
.DO NOT insert any objects into the fan grill or the ventilation area of the power supply unit.
.DO NOT place any objects in front of the fan or the ventilation area of the power supply unit that may obstruct or restrict the airflow.
.USE ONLY the modular cables bundled with the power supply unit. DO NOT use any third party cables or extension cables with this unit.
.Avoid dust, humidity, and temperature extremes. Do not place the power supply unit in any area where it may become wet.
.The power supply unit is for integration into a computer, and not intended for external or outdoor usage.
.Failure to comply with any manufacturer instructions and/or any of these safety instructions will immediately void all warranties and guarantees.
USE ONLY the modular cables bundled with the power supply unit. DO NOT use any third party cables or extension cables with this unit.
XPG LEVANTE is filled with low-evaporation coolant rated with a 50;000 hours lifespan. You will never have to worry about refilling the coolant.
The XPG LEVANTE is build and tested to ensure leakage doesn't occur.
XPG LEVANTE is designed to synchronize with ASUS Aura Sync, GIGABYTE RGB Fusion, MSI Mystic Light Sync and AsRock Polychrome. If your motherboard has a 5V addressable RGB header, you can control the lighting effect through the respective software. For more details, please refer to the motherboard manufacturer’s website.
The XPG LEVANTE supports Intel 1366; 115x ; 2066; 2011 and AMD AM4 socketsXPG LEVANTE support Intel 1366; 115x ; 2066; 2011 and AMD AM4 sockets.
XPG XENIA provides an approved preset called “Performance mode” that pushes the limit of the laptop by boosting wattage of both GPU and CPU to the limit of the thermal solution, trading off an increase of fan noise and touch temperatures to increase power. This option is available via its dedicated button next to the power button or via XPG Prime software configuration.
While you should have a bit of fun, remember that heavily manipulating voltages for logical parts using third party tools may result in shorter lifespan of your unit and in some cases may even void warranty.
BTW, the Laptop is already slightly undervolted by factory default to improve performance and reduce throttling.
XPG Primer features three polling rates, 250Hz (blue), 500Hz (green), and 1000Hz (red). To change polling rates, hold down the right button and scroll wheel together for 3 seconds. Light will flash to indicate that the new adjustment has been stored successfully.
XPG Primer has 6 DPI settings. Default is 800 DPI. To change the setting during gameplay simply press the DPI button right underneath the scroll wheel. When the new setting is being stored in the internal memory the light will flash 3 times to indicate that the new setting has been saved as default
The XPG PRIMER has 3 light effects. Default effect is color wave. If the light is turned off, you can press the RGB setting key to check and change the current light setting.
You can select RGB effects with the dedicated RGB button located below the scroll wheel, under the DPI Selector.
Aside from the standard shortcuts found in most laptop (media controls, Airplane mode, sleep mode, display and keyboard brightness adjustments and screen toggle), this laptop features also a Windows key lock mode to avoid accidental presses when gaming.
No, XPG XENIA does not support INTEL XMP, which is not included in Gaming class H family processors.
We have enabled recovery functionality by default, which is accessible by pressing F9 during boot when the XPG logo appears. As such, we also partitioned the drive in two logical units, so that you can perform a recovery operation on the C: volume without blowing your data left on the D:.
You can use Disk management tool if you prefer to remove the D: partition and Resize the logical drives. Removing the recovery partition, although not recommended, is also feasible and you can easily find instructions in forums online if you require the extra space.
Software applications and updated firmware are available on XPG XENIA’s official product website in the download area. Drivers are automatically updated via Windows Update as per Windows 10 requirement.
XPG PRIME (beta) is an XPG flavored control center software for XPG XENIA laptops. It allows you to adjust RGB lighting effects of the keyboard and front light bar, tweak power modes (Performance, Standard and Battery Saver, including changing fan profiles for acoustic performance) as well as monitor your hardware usage.
The software also enables an On-Screen-Display for the available shortcuts via Function Keys.
This version is specific for notebooks only, hence the beta marking. It is also a separate development effort from the XPG PRIME ecosystem application that supports other XPG devices.
XPG PRIMER was designed mainly for casual gamers that want a good mouse with all ley functionalities and for those who are approaching gaming mice for the first time. The mouse was created with simplicity in mind without falling short on a durable high quality build. It was sculpted for right-handed users and the curves have been studied to be adaptable well for all types of grips on small and medium sizes hands. Larger hands are also suitable for fingertip grips. The raised center ridge on the buttons is ideal to help finding immediately an optimal curvature for fingers and to apply an ideal pressure for rapid and precise clicks.
As most mice, just connect the XPG PRIMER to your device via its USB port and your OS will automatically recognize the mouse within the built-in USB HID driver.
Please only use the modular cables bundled with the power supply unit. DO NOT use any third party cables or extension cables.
There are two light strips on the mouse pad; you can select the light strip you would like to control; you can also select both light strips.
Step 1- Double click the control button to select the light strip.
Step 2- The selected lighting strip will flash; you can also select both light strips; in which case both will flash.
Step 3- Click the control button to change the lighting color/effect.
No; you can setup the lighting through the control box on the top left hand corner. (refer to question 5)
XPG BATTLEGROUND XL PRIME comes with Micro-USB to USB cable. This provides power for the LED lighting
Please roll XPG BATTLEGROUND XL with the printed side facing outward and the rubber side facing inward.
Windows 7/8/10 have a built-in screenshot function called
CORDURA® is a collection of fabric technologies used in a wide array of products including luggage; backpacks; trousers; military wear and performance apparel. Cordura fabrics are durable and resistant to abrasions; tears and scuffs.
Please use a clean damp cloth to clean the product properly. Do not use any soaps or solvent agents on the mouse pad surface to preserve its integrity.
CHERRY MX switches are the absolute industry benchmarks; developed and manufactured in Germany.
XPG SUMMONER accessories include a magnetic wrist rest; additional nine red keycaps (WASD; four arrow keys and ESC) and a keycap puller.
XPG INVADER can accomodate radiators up to 360mm in front; 240mm radiators on the top and side; and 120mm radiators at the back.
Please consult the USB 3.0 connection section on your motherboard's manual.
You can install two SSD behind the motherboard tray in the 2.5" hard drive bracket and two SSD in the hard drive brackets under the PSU cover. Note, when you install four SSD’s you will forgone space for 3.5" hard drives.
You can install up to eight fans on the XPG BATTLECRUISER. If your RGB fans has a 3pin or 4pin RGB header; it can be controlled with XPG PRIME CONTROLLER on the front I/O panel. You can find installation instructions here.
Yes; the XPG BATTLECRUISER has two USB 3.0 ports and a USB Type-C port on the front I/O panel.
XPG BATTLECRUISER comes with four ARGB fans; three in the front and one in the back.
The XPG BATTLECRUISER can support graphic cards up to 400mm in length.
XPG BATTLECRUISER supports E-ATX; ATX; Micro ATX and Mini-ITX motherboards.
XPG BATTLECRUISER can accomodate radiators up to 360mm in the front; 360mm on the top and 120mm at the back. Please note you cannot install two 360mm radiators at the same time.
The XPG INVADER supporst ATX; Micro ATX and Mini-ITX motherboards
The XPG INVADER supports graphics cards up to 400mm in length. Be sure to confirm the size when purchasing a graphics card.
XPG INVADER comes with two black fans; one in the front and one in the back.
Here are the characters of the different switches; you can choose the one that fits best for you; Alternatively; try the switches at your nearest XPG dealer and choose the best fit for you.
XPG SUMMONER offers onboard lighting effects, and via XPG PRIME software there are more lighting effect options available for gamers to customize.
Default lighting effects:
-Press FN + UP/DOWN arrow key to adjust the lighting brightness.
There are 5 brightness levels in the following sequence: OFF / 25% / 50% / 75% / 100%
-Press FN + LEFT/RIGHT arrow key to choose a lighting effect
There are 7 predefined Lighting effects in the following sequence: Static / Breathing / Trigger / Explosion / Color Cycle / Color Wave / WASD mode
-For more information please visit【XPG SUMMONER How-to Video】How to adjust the RGB lighting effects on XPG SUMMONER-https://youtu.be/PYBUw98xt2E
Please use a clean damp cloth to clean the product properly.
Do not apply any soap or solvent agent on the surface to preserve its integrity.
Under the normal mode, Windows key can be disabled or abled by pressing “FN” + “WINDOWS” key. Windows key is disabled by default when gaming mode is on, including when under any gaming profiles and cannot be activated.
【XPG SUMMONER How-to Video】How to disable Windows key- https://youtu.be/8jcuvNVPiAI
Under the normal mode; the static color is red of your XPG SUMMONER. Static colors are assigned by default to each gaming profile as follows: Profile 1: blue;Profile 2: indigo; Profile 3: white; Profile 4: green; Profile 5: yellow.
You can install up to nine fans on the XPG INVADER. If your RGB fans have a 3pin or 4pin RGB header; they can be controlled via the XPG PRIME CONTROLLER on the front I/O Panel. You can find installation instructions here.
ADATA in-house SSD production process gives us the ability to hand-craft the modules for these specific units. Only PCIe Gen 4 SSDs with selected top bins of NAND flash and controllers qualify for XPG XENIA Xe.
XPG XENIA Xe comes with a preinstalled 1TB XPG M.2 2280 SSD (PCIe Gen 4). Users can upgrade the storage amount by purchasing a new M.2 2280 SSD and replacing the preinstalled one. No additional M.2 slots are available on this product.
The preinstalled LPDD4x RAM cannot be replaced or upgraded.
XPG XENIA Xe can connect to up to 3 external displays. One via HDMI port and two more via Thunderbolt 4 ports via DP mode.
Wi-Fi 6 is the latest generation of wireless protocol that delivers greatly reduced latency (up to 75% reduction) when connecting and increased gigabit speeds up to ~1700 Mbps.
To take full advantage of this new technology, make sure to use a compatible wireless router that supports 802.11ax and 160Mhz channel bandwidth. Those speeds may vary greatly based on local traffic, your ISP’s local capability, and the wireless router itself.
XPG XENIA Xe can operate for up to 16 hours in Battery Saver mode when WIFI is turned off and luminosity is set to low. Depending on the settings and function, you can expect an average of 12 hours in Battery Saver mode.
Spare power adapters will be available to purchase from the XPG online store soon. XPG also has a line of backpacks that are great for transporting your notebook and any other related gear you need to bring when you travel.
XPG also offers a number of high quality peripherals such as headsets and mice.
XPG XENIA Xe’s default Windows 10 image was kept as clean as possible with no bloatware and the absolute minimum number of necessary configuration applications.
Aside from Windows 10 and drivers, the only additional software included are a set of preloaded XPG wallpapers, Intel NUC Software Studio, and Intel NUC Audio Studio. All systems are factory activated. As the OS comes standard with Xbox Game Pass for PC, XPG provides one free month of the service for first time subscribers. Please note the month of service does not start until you manually activate your subscription.
Yes. XPG XENIA Xe comes with a built-in microphone array and a front lightbar that can be associated with multiple smart assistants. Compatability may vary by software and region.
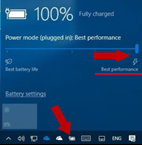
Windows 10’s default performance setting is in the middle of Best Battery Life vs. Best Performance. To increase performance quality, click the battery icon at the bottom right corner and manually slide the performance bar towards the Best Performance (right) side while gaming or during any CPU/GPU intensive application.
It comes standard with 1 year of warranty protection
(warranty may vary by different regions).
Due to current supply chain limitations, XPG XENIA Xe is only available in USA, Mexico, and Latin America during the initial launch period. As production continues, this product will be made available in other countries over time. We apologize for the inconvenience.
ADATA's in-house SSD production process gives us the ability todevelop modules for specific systems. Only PCIe Gen 4 SSDs with selected top bins of NAND flash and controllers qualify for the XPG XENIA 14.
The XPG XENIA 14 comes with a preinstalled 512GB XPG M.2 2280 SSD (PCIe Gen 4). Users can upgrade the storage by purchasing a new M.2 2280 SSD and replacing the preinstalled one. There is also an unpopulated m.2 PCIe Gen 3 slot available for users to upgrade.
The preinstalled 16GB XPG Gammix SO-DIMM only occupy a single slot and the user has the option to add another SO-DIMM DDR4 RAM on the unpopulated slot.
XPG XENIA 14 can connect to up to three external displays. One via HDMI port and two more via Thunderbolt 4 ports via DP mode.
Wi-Fi 6 is the latest generation of wireless protocol that delivers greatly reduced latency (up to 75% reduction) when connecting and increased gigabit speeds up to ~1700 Mbps.
To take full advantage of this new technology, make sure to use a compatible wireless router that supports 802.11ax and 160Mhz channel bandwidth. Those speeds may vary greatly based on local traffic, your ISP’s local capability, and the wireless router itself.
XPG XENIA 14 can operate for up to 10 hours in Battery Saver mode when WIFI is turned off and luminosity is set to low. Depending on the settings and usage scenario, your actual battery life may vary.
Spare power adapters will be available to purchase from the XPG Online Store soon. XPG also offers a lineup of backpacks that are great for transporting your notebook and any other gear you need to bring when you travel.
XPG also offers a number of high-quality peripherals such as headsets and mice.
XPG XENIA 14’s default Windows 10 image was kept as clean as possible with no bloatware and the absolute minimum number of necessary configuration applications. Aside from Windows 10 and drivers, the only additional software included are a set of preloaded XPG wallpapers and XPG PRIME Lite control center. All systems are factory activated. As the OS comes standard with Xbox Game Pass for PC, XPG provides one free month of the service for first time subscribers. Please note the month of service does not start until you manually activate your subscription.
It comes with a 1-year warranty
(the warranty may vary by regions).
The XPG XENIA 14 was initially launched in the USA and Latin America (including Mexico). As production continues, this product will be made available in other countries/regions over time.
إذا كان لديك قرص M.2. 2280 SSD يمكن العثور على تعليمات التركيب هنا.
أولاً، تأكد من عامل شكل أقراص SSD - M.2 أو mSATA أو SATA. حدد نوع الفتحة الصحيح على اللوحة الأم، وأدخل SSD، وتثبته بالمسامير. للحصول على فيديو بإرشادات M.2 SSD على سطح المكتب يرجى النقر هنا، وM.2 SSD على الكمبيوتر المحمول يرجى النقر هنا، وSATA SSD على سطح المكتب يرجى النقر هنا، وSATA SSD على الكمبيوتر المحمول يرجى النقر هنا.
أولاً، تحقق من صنع ومواصفات اللوحة الأم على موقع الشركة المصنعة لمعرفة ما إذا كانت تحتوي على فتحات M.2 تدعم PCIe 4x4. إن وجدت فتحتان M.2 PCIe 4x4 فيمكن استخدام الرابط المباشر إلى مقبس M.2 الخاص بطرفية وحدة المعالجة المركزية (المعالج المركزي) للحصول على أداء أفضل.
لا يزال بإمكان أجهزة الكمبيوتر التي لا تدعم محركات أقراص PCIe Gen4 SSD استخدام محركات أقراص SSD المذكورة. ومع ذلك يقتصر أداء محركات أقراص SSD على مستويات PCIe Gen3.
إذا واجهت هذه المشكلة فيرجى الرجوع إلى دليل مستخدم اللوحة الأم أو موقع الشركة المصنعة على الويب. تختلف اللوحات الأم حسب الموديل والعلامة التجارية. نوع وعدد منافذ الدخل/الخرج ليست هي نفسها، لذلك، عند إدخال محرك أقراص SATA أو NVMe M.2 SSD في الفتحة، فقد يتأثر بالدخل/الخرج. ينتج عن
1. Make sure you have already formatted and partitioned your new 2.5" SATA of M.2 SSD. For detailed instructions for Windows 7, please click here; For Windows 8.1 or Windows 10, please click here; For Windows XP, please click here.
2. If your SSD cannot be detected (including unrecognizable, unreadable, etc.) after it has worked normally for a period of time, please follow steps:
M.2 SSD => Loosen the screws and remove the M.2 SSD and check the interface connector for dirt or scratches. Then reinstall it.
SATA 2.5-inch SSD => Unplugged the SATA cable and check the interface connector for dirt or scratches. Then reinstall and ensure the cable is properly plugged in. In some cases, an old cable may cause your SSD to not be detected.
If you have tried the above but the problem persists, the SSD might be faulty. Check your warranty period on ADATA's official website.
If you have used the SSD normally before, but then fails to format, please try the following steps:
1. Enter "diskpart" in the command line of the "Start" menu and press "Enter" (or use the "Windows" key and "R")
2. Enter "List disk" and press "Enter" to check the hard disk number (the system disk is Disk 0. If only 1 SSD is connected, it should labeled as Disk 1.)
3. Type "select disk 1" and press "Enter" to select the SSD
4. Type "clean" and press "Enter", the partitions of the SSD will be deleted
Set up RAID 0 on a compatible motherboard, then connect two SSDs of the same specification to the set port. For detailed instructions, please refer to your motherboard's user manual. The performance of the SSD with a RAID 0 configuration will be double that of a single SSD.
ADATA SSDs can use standard drivers, which can be applied to different operating systems; at the same time, users can also install the drivers officially provided by the motherboard manufacturers. If you have other questions, please contact ADATA's customer service center.
Note:
1. NVMe (PCIe) M.2 SSDs require Windows 8.1 or later to support the NVMe driver (it is recommended to update to Windows 10 or later). Linux series such as Fedora, SUSE, Ubuntu, Red Hat are also supported
2. AHCI (SATA) M.2 SSDs are compatible with Windows 7 and later
Since SSDs don't have mechanical drives, so there is no need for defragmentation. Defragmenting an SSD may cause unnecessary wear and tear. SSDs are designed to write data evenly on the entire drive as much as possible, thereby reducing excessive wear on any one location.
ADATA SSDs are designed in accordance with the Serial ATA International Organization standards and have undergone rigorous testing to ensure they work with various operating systems.
Note:
1. NVMe (PCIe) M.2 SSDs require Windows 8.1 or later to support the NVMe driver (we recommend Windows 10 for better the best experience and usability). Linux, including Fedora, SUSE, Ubuntu, and Red Hat, is also supported.
2. AHCI(SATA) M.2 SSDs can be used with Windows 7 or later.
Troubleshoot with the following:
1. The SSD has wear-leveling technology built-in to enhance the product's lifespan. The slower speeds may be due to concurrent reformatting, but this situation is not common, especially when it is not a brand new SSD. Contact our customer service staff for help in troubleshooting.
2. Insufficient free space will also affect the writing speed. You can try to delete files to free up space on your SSD.
This is related to the storage format of your SSD. If using the Windows FAT32 format, the maximum size of any single file is limited to 4GB. To avoid this situation, please change reformat your SSD to NTFS.
HDD Sentinel Health displays anomalies because this tool incorporates the S.M.A.R.T attribute 168 (A8), 159 (9F) fields into the health display, but these two fields are self-defined by each vendor, so these two fields are not associated with health calculations. Please remove the wrong interpretation position of the two fields according to the illustration, and the SSD health can be displayed as normal.
The difference in capacity is mainly due to the different calculation methods used by your PCs operating system and the SSD. SSDs calculate capacity based on the decimal system, e.g.: 1KB - 1000 Byte bytes, 1MB - 1000KB, 1GB - 1000MB, 1TB - 1000GB, and so on; Your PCs operating system uses the binary system, e.g. 1KB x 1024 Byte byte, 1MB x 1024KB, 1GB x 1024MB, 1TB x 1024GB, and so on. For example, if the packaging shows capacity or 500GB, it is calculated as follows: 500GB x 500 x 1,000MB x 1,000KB x 1,000Byte x 500,000,000,000Byte. Your PCs operating system will calculate as follows: 500,000,000,000 Byte/1024KB/1024MB/1024GB, or approximately 465GB.
Remarks: For a faster calculation method, the capacity listed on the packaging can be calculated as x0.93=SSD for approximate capacity
Speeds may vary because different test software use different parameter settings and test methods, and the different testing environments and PC configurations may also have an influence (for example: different motherboards or CPUs, etc.). In addition, the amount of free space, namely lack of, will also affect writing speeds. For better performance, you can try the following:
1. Please check if the slot currently used by the SSD can support the specifications of the SSD. (For example, if a PCIe Gen3x4 SSD is inserted into a PCIe Gen3x2 slot, the speed will be limited by the PCIe Gen3x2 slot)
2. Remove unnecessary software or data from the SSD, or reformat it.
3. Use CrystalDiskMark or ATTO Disk Benchmark to test your SSDs speeds.
4. If your SSDs speed is still slow, please take a screenshot of your SSDs speed test results and send it to our customer service staff for review.
The lifespan of an SSD is based on its health. ADATA's SSD ToolBox is a set of auxiliary software for checking SSD health. In principle, your health will be determined by the length of time you use your SSD and the number of read and write cycles. The longer you use it, the more read and write cycles, the shorter the lifespan of your SSD. Generally speaking, SSDs have wear-leveling technology built-in that helps extend the lifespan of your SSD. However how you use your SSD is the main factors in determining your SSDs lifespan. If a large amount of data is written over a long period of time or if you use your SSD in extreme environments, lifespan may be shortened.
Download ADATA SSD ToolBox: https://www.adata.com/kw/support/downloads/
At present, various storage methods, including optical discs, hard drives, and SSDs are not ideal for storing data permanently. Therefore, we recommend that important data be backed up to several different devices to diversify your risks.
According to the Serial ATA International Organization the SATA 3.0 specification offers transfer speeds up to 6Gbps compared to 3Gbps for SATA 2.0. Regardless, SATA 2.0 and SATA 3.0 use the same interface and cables.
SSD TRIM is an Advanced Technology Attachment (ATA) command that enables an operating system to inform a NAND flash solid-state drive (SSD) which data blocks it can erase because they are no longer in use. The use of TRIM can improve the performance of writing data to SSDs and contribute to longer SSD life. Currently, TRIM is used in Windows 7, Server 2008, Mac OS 10.7, and newer versions of Linux. In addition, regardless of operating system, no RAID configuration supports TRIM.
Wear leveling is a process that is designed to extend the life of solid state storage devices. SSDs are store data in blocks. Each block can tolerate a finite number of program/erase cycles before becoming unreliable. For example, MLC NAND flash is typically rated at about 3,000 program/erase cycles. Wear leveling arranges data so that write/erase cycles are distributed evenly among all of the blocks in the device.
DRAM buffer is a function designed to improve the efficiency of reading and writing. Generally, it is composed of 1 to 2 DRAM modules on an SSD. Whether an SSD has a DRAM buffer is often decided by the manufacturer according to its market positioning. Generally speaking, entry-level models do not typically have a DRAM buffer.
XPG CRUISER can accommodate a radiator up to 360mm at front; a 280mm radiator on the top and a 140mm or a 120mm radiator at the back.
There are x3 XPG VENTO 120 ARGB fans pre-installed.
XPG CRUISER can support graphic card up to 350mm in length (without a radiator installed at front). If you wish to install it vertically, please make sure the recommended distance between the graphic card and the PSU chamber is 27mm.
XPG CRUISER supports Mini-ITX, Micro-ATX, ATX, E-ATX, CEB, EEB motherboards.
XPG XENIA 15 KC comes pre-installed with an award winning XPG Gammix S70 1TB SSD which boasts some of the best speeds available at the time of launch. Many other systems may still come equipped with PCI Gen 3 or slower frequencies SSDs, while Xenia 15 KC offers the pinnacle of XPG SSD Research and Development
Dual Rank memory can improve data throughput of 20% to 40% reducing CPU workload and lowering latency, which creates more headroom for an additional burst in performance or for decreased temperatures when less cycles are wasted waiting for memory.
The XPG XENIA 15 KC comes with a preinstalled 1TB high performance XPG GAMMIX S70 M.2 2280 SSD (PCIe Gen 4). Users can expand the storage by purchasing a new M.2 2280 SSD and installing on the spare M.2 PCIe Gen 3 slot or even replace the preinstalled SSD. The preinstalled 16GB x 2 hand sorted dual rank dual channel XPG SO-DIMM memory offer great performance, but can also be replaced to expand up to 64GB of memory.
Every thermal solution will face performance degradation over time. Our liquid metal solution is installed per industry standards and has been designed to offer superior performance and longevity compared to standard thermal paste and is covered to outlast the warranty period.
XPG XENIA 15 KC can connect to up to two external displays. One via HDMI port and one more via Thunderbolt 4 port. This can be further expanded by connecting a Thunderbolt hub with multiple display outputs.
Wi-Fi 6 is the latest generation of wireless protocol that delivers greatly reduced latency (up to 75% reduction) when connecting and increased gigabit speeds up to ~1700 Mbps.
To take full advantage of this new technology, make sure to use a compatible wireless router that supports 802.11ax and 160Mhz channel bandwidth. Those speeds may vary greatly based on local traffic, your ISP’s local capability, and the wireless router itself.
XPG XENIA 15 KC can operate for up to 7 hours in Battery Saver mode when WIFI is turned off and luminosity is set to low. Depending on the settings and usage scenario, your actual battery life may vary.
Spare power adapters will be available to purchase from the XPG Online Store soon. XPG also offers a lineup of backpacks that are great for transporting your notebook and any other gear you need to bring when you travel.
XPG also offers a number of high-quality peripherals such as headsets and mice.
XPG XENIA 15 KC's default Windows 10 image was kept as clean as possible with no bloatware and the absolute minimum number of necessary configuration applications. Aside from Windows 10 and drivers, the only additional software included are a set of preloaded XPG wallpaper, Intel NUC Studio and Intel NUC Audio software. All systems are factory activated. As the OS comes standard with Xbox Game Pass for PC, XPG provides one free month of the service for first time subscribers. Please note the month of service does not start until you manually activate your subscription.
XPG XENIA 15 KC comes with three preset performance modes that can be further customized through INTEL NUC STUDIO software for a personalized operation that fits your user scenario the best. These modes can be quickly and easily switched with the dedicated QUICK MODE BUTTON next to the POWER ON button.

It comes with a 1-year warranty. (the warranty may vary by regions).
The XPG XENIA 15 KC was initially launched in the USA and Latin America (including Mexico). As production continues, this product will be made available in other countries/regions over time.
XENIA 15 KC’s per-key RGB keyboard is specially designed for gamers. The spacious optical-mechanical switch, 2mm short key travel and just 0.2ms ultra-low latency made your fingers fly through and win every battlefield. With 50 million key presses lifecycle, silent and tactile keystroke and anti-ghosting design, you can fast sneak attack every enemy you encounter.
XENIA 15 KC comes with 15.6-inch QHD (2560 x 1440) , 165Hz matte IPS and 300 nits panel that delivers striking gaming visuals. The 85% screen ratio, 4.9mm narrow bezel and 100% sRGB color gamut provide boundless vision with a stunningly immersive experience. You can smoothly opened your laptop with just one hand.
يرجى الانتقال إلى موقع Prime على الويب لمزيد من المعلومات.
The XENIA 15 KC draws fresh air from inlets located at the bottom of the unit, and expels hot air at the sides and rear, just like the vast majority of Portable PCs.
To ensure efficient heat dissipation, we suggest to avoid placing the XENIA 15 KC on a soft surface and to provide ample space for airflow so your XENIA 15 KC can ventilate properly.
Failure to do so will cause fans to spin longer and louder, and may cause performance degradation or even system shutdown for overheat protection in extreme cases.
عند اكتشاف وحدات الذاكرة يتحول PRIME افتراضيًا إلى الوحدة الأولى التي تم التعرف عليها. ومع ذلك، لا يوصى بخلط أنواع مختلفة من وحدات الذاكرة على نفس اللوحة الأم.
إذا تعذر على XPG Prime اكتشاف وحدات الذاكرة بشكل صحيح فيرجى اتباع الإرشادات أدناه لاستكشاف الأخطاء وإصلاحها.
1. يُرجى إغلاق جميع برامج تأثيرات الإضاءة الأخرى (مثل Asus Armory Crate/Aura sync، *MSI Mystic Light وGigabyte RGB Fusion وغيرها)
* إذا كنت ترغب في استخدام Prime بعد تثبيت برنامج MSI للتحكم في الإضاءة فيجب إلغاء تثبيت برنامج MSI، وإيقاف تشغيل الطاقة، ثم إعادة التشغيل قبل تثبيت Prime وتمكينه.
2. اخرج من XPG PRIME بالنقر بزر الماوس الأيمن فوق رمز PRIME الموجود في منطقة إشعارات شريط المهام، وأعد تشغيل التطبيق.
إذا استمرت المشكلة فالرجاء إلغاء تثبيت التطبيقات الأخرى المصممة لقفل التحكم في الجهاز، وإيقاف تشغيل الكمبيوتر تمامًا، وإعادة تشغيله.
XPG CYBERCORE’s capacitors are all Japanese, 105℃ rated quality. XPG CYBERCORE PLATINUM power supply uses Japanese capacitors for its reliability in performance and stability. From electrolyte system to conductivity and efficiency, XPG CYBERCORE utilizes high quality material that does not compromise in achieving 80 PLUS PLATINUM efficiency rating.
نعم. ومع ذلك، إذا تم اكتشاف طراز قديم لا يمكن التعرف عليه تلقائيًا يعرض PRIME مطالبة تسمح بتحديد طراز من قائمة منسدلة. يرجى زيارة موقع Prime على الويب لاكتشاف المزيد من طرازات XPG DRAM المدعومة من PRIME.
Yes, XPG CYBERCORE does have the design that aims to minimize ripple noise, ultimately minimizes temperature increase and prolongs the power supply’s life expectancy. During the process, the design reduces energy loss, so at 50% load (@ 230VAC) the power supply can perform 94.18%.
يمكن لمستخدمي Intel تمكين XMP لإعداد رفع تردد التشغيل، كما هو الحال بالنسبة لمنصات AMD الرئيسية، يمكن للمستخدمين تمكين DOCP أو EXPO (DDR5) في BIOS. من خلال وظيفة إعدادات التشغيل البسيطة لتحقيق رفع تردد التشغيل وأفضل حالة لأداء النظام واستقراره.
The power supply selects XPG VENTO PRO 120 PWM Fan by Nidec as its cooling source to dissipate heat. XPG and Nidec partnered back in 2020 with the new PWM feature, and XPG CYBERCORE is the second collaboration with Nidec. The brand successfully accumulates numerous accolades with patented cooling solutions in various industries, and for the desktop fan field Nidec’s famous GentleTyphoon series has been the sensation to PC users for decades. The fan is famous for its innovative fan blade design, capable of generating high static pressure and airflow, at the same time reduce vibration and operating noise. Its Japanese precision Dual Bearings further boost efficiency and stability, and prolong fan’s life expectancy. Together with the power supply unit, XPG CYBERCORE is built for the extreme performance.
في نظام التشغيل Windows انقر فوق الزر 'Start'، ثم انقر فوق 'Control Panel' وافتحها.
→ في Windows يرجى استخدام العرض التقليدي. انقر فوق 'System' وافتحه لعرض المعلومات الأساسية للكمبيوتر، بما في ذلك إجمالي ذاكرة RAM المركبة.
→ في نظام MacOS، انقر فوق 'About this Mac' أو 'About this Computer' من قائمة Apple في الزاوية العلوية اليسرى. تعطى معلومات حول إجمالي الذاكرة في نظام التشغيل Mac. (بما في ذلك الذاكرة المدمجة وذاكرة DIMM أو SIMM المركبة خارجيًا.)
→ في Linux، افتح نافذة طرفية، وأدخل الأمر التالي: cat /proc/meminfo لعرض إجمالي سعة ذاكرة الوصول العشوائي بالإضافة إلى معلومات الذاكرة الأخرى.
To ensure the power delivery efficiency is up for the expectation, both PCI-E and CPU cables of XPG CYBERCORE offer 16AWG thickness for better power delivery, efficiency and conductivity. The benefit with the 16AWG thickness also ensures full power +12V output, notably for high wattages XPG CYBERCORE 1300W and 1000W. The output current of 1300W is 108.33A, and for 1000W the output current is 83.33A. Better conductivity means less heat expelled from the cables, and safer overall for the system.
In a quiet environment and in specific ambient conditions, a high-pitched sound may occur due to the vibrations and friction of power components on the circuit board. This high-pitched sound is a normal physical phenomenon and does not affect your notebook's safety and performance.
لا تؤدي الذاكرة الخارجية دائمًا إلى زيادة سرعة أداء الكمبيوتر. لكنها مفيدة في العمليات المتعددة المتزامنة والتي تستلزم تشغيل العديد من البرامج أو الإجراءات، أو تفيد في تشغيل البرامج الذي تتطلب قدرًا كبيرًا من الذاكرة. إذا كانت مساحة الذاكرة التي تم تركيبها في الأصل لا تتعامل مع البرامج أو الإجراءات الجاري تشغيلها فمن الممكن رفع مستوى الأداء.
XENIA Xe's RGB LED light bar is used only to notify you that Alexa is active.
For light bar to work, please install Alexa software and turn on light bar selection in Intel® NUC Software Studio.
في كثير من الحالات يقوم BIOS أو برنامج التشخيص بالإبلاغ عن تردد ناقل الذاكرة ، والذي يمثل نصف تردد الذاكرة. لأن معدل نقل بيانات DDR (نقل البيانات المزدوج) هو ضعف تردد ناقل الذاكرة. إذا كانت سرعة الناقل 800 ميجا هرتز، مع استخدام ذاكرة DDR3-1600، فإن سرعة تشغيل الذاكرة الصحيحة هي 1600.
XENIA Xe's front battery indicator lights only when the lid is closed to indicate battery status.
وفقًا لكل تصميمات BIOS المختلفة لمصنعي اللوحة تتم مشاركة الذاكرة مع اللوحة الأم-
1. ذاكرة المشاركة على اللوحة
2. جهاز PCIE
3. قد يحتاج BIOS إلى استخدام 1 ميجابايت كحد أدنى.
4. DVMT (المرفق هو ورقة بيانات DVMT لمنتج شرائح سلسلة Intel 6.
يختلف تصميم وحدة الذاكرة باختلاف السعات، وتعتمد تهيئتها على أفضل أداء للنظام والذي يختلف مع تصميم اللوحة الأم باختلاف الشركات المصنعة.
XPG notebook battery is strictly tested and has automotive power off protection design. To prolong your battery life, we recommend shut down your notebook when not in use to prevent notebook in long time standby situation, or unplug your AC adapter when your notebook is long-time storage not in use. Please prevent constantly changing your notebook under high voltage and avoid storing your notebook in high temperature and damp conditions.
A new Battery Management BIOS is provided for XPG XENIA 15 to optimize your notebook battery power efficiency. Please visit download page to update.
تختلف تقنية استخدام وحدتي DIMM لكل قناة (2DPC) عن تقنية القناة المزدوجة. يوصى بضبط مواصفات تقليل التردد لضمان استقرار رفع تردد التشغيل. على سبيل المثال، إذا كنت تريد أن تصل إلى 6000 MT/s فأنت بحاجة إلى شراء ذاكرة DRAM قادرة على 6400 MT/s. السبب الرئيسي هو محدودية اللوحة الأم. عند دعم الذاكرة يمكن تحسين خصائص رفع تردد التشغيل من خلال BIOS. ومع ذلك، عند إدخال أربع قنوات يلزم وجود مواصفات أعلى لتلبية متطلبات نظام BIOS، بحيث يمكن للنظام العمل بثبات حتى في حالة رفع تردد التشغيل.
وحاليا لم تصدر جهات تصنيع اللوحات الأم QVL مع 4 قنوات. لذلك لا يمكن للمستخدمين بشكل عام معرفة قائمة الذاكرة ذات الأربع قنوات من الموقع الرسمي لعلامات اللوحات الأم.
QVL تعني قائمة الموردين المؤهلين، والتي يتم توفيرها من قبل شركة مصنعة للوحة الأم لضمان أن الذاكرة تعمل مع اللوحة.
عند شراء DDR5 DRAM يجب أن تعي ميزات اللوحة الأم أولاً، وتتأكد من تردد الذاكرة المدعومة عن طريق التحقق من QVL.
After downloading and installing the software, connect the mouse to PC to begin customization with XPG PRIME software.
لضمان التشغيل المستقر للنظام يقوم النظام تلقائيًا باكتشاف منتج الذاكرة بمواصفات التردد المنخفض، وتعيينه لتشغيل التردد والمعلمة الأقل؛ ولن يقوم النظام بتشغيل منتج الذاكرة بتردد أعلى.
XPG PRIME software offers 3 main functions: to set up Lighting, Performance and to determine the power usage preference in Power Status tab.
- User can quickly change the lighting effect with presets, or advance to more detailed settings such as individual lighting sectors and brightness on the mouse.
- In the Performance tab, user can decide the number of DPI steps, and the sensitivity of each DPI step. Angle snap, debounce time and polling rate are all available for user to customize.
- In the power status options, gamers can adjust the idle interval time before the mouse enters the sleep mode. The low power warning setting allows gamers to set the percentage of the remaining power themselves so that when the power is in the low power status, the DPI button will be displayed with a red light.
عندما تقترن ذاكرة RGB بذاكرة من غيرها قد يعمل النظام بشكل طبيعي، ولكن لا يمكن تركيب XPG RGB AP. بمجرد التركيب لن يعرض البرنامج RGB DRAM.
At the bottom of mouse, right next to the sensor there is a switch that user can choose the connection mode between 2.4G wireless, Bluetooth, or Off. The wireless 2.4G dongle embedded inside the mouse needs to connect to the PC.
1. إذا كانت وحدة الذاكرة مشتراة حديثًا فتأكد من أن وحدة الذاكرة القديمة والذاكرة المشتراة حديثًا من نفس العلامة التجارية والتردد والسعة وعدد الجسيمات. إذا كانت الوحدتان متطابقتين، فيوصى بمحاولة إدخال الذاكرة في كمبيوتر آخر أو فتحات أخرى على اللوحة الأم. إذا استمرت المشكلة فقد يكون ذلك بسبب تعطل في الذاكرة. يوصى بإرسال المنتج إلى تاجر الشراء الأصلي أو أقرب مركز خدمة معتمد من ADATA للإصلاح.
إذا كانت وحدة الذاكرة الجديدة ليست من نفس العلامة التجارية كالقديمة فيمكن الرجوع إلى توافق وحدات الذاكرة من الشركة المصنعة لجهاز الكمبيوتر.
2. إذا كان هناك خطأ في الاستخدام العادي ويمكن إصلاحه من خلال مركز الخدمة يمكن الاتصال بمندوب المبيعات أو مركز الخدمة لدينا للإصلاح. إذا تعذر إرسال الوحدة إلى مركز الخدمة للإصلاح فيمكن التقدم بطلب للإصلاح عبر الإنترنت على موقع الويب الرسمي لشركة XPG:
بعد إكمال الطلب يرجى اتباع التعليمات لتعبئة بيانات المنتج بشكل صحيح، وإعادته إلى العنوان المحدد. نقوم بتنفيذ عملية الإصلاح لك في أقرب وقت ممكن بعد الاستلام.
يقدم مركز الخدمة خدمة إصلاح المنتجات فقط (يجب ألا تظهر أي تلفيات خارجية على المنتج ، ويجب أن تكون الملصقات سليمة). يتم تحديد نطاق الضمان وأصالة المنتج من قبل جهة التصنيع الأصلية بناءً على المنتج المادي المستلم. يوصى بتقديم صورة واضحة للوجه الأمامي والخلفي للمنتج قبل إرساله للإصلاح.
[تذكير هام: إذا كانت وحدة الذاكرة بحاجة إلى تشغيل قنوات مزدوجة فيرجى إرسال كلتا الوحدتين معًا للإصلاح لتسهيل اختبار القناة المزدوجة.]
On top of the mouse you can find a triangular button that can be used as DPI button, but there are more:
Preset 6 DPI steps from 400, 800, 1600 ,3200, 6400, and 16000 (max). When switching between each step, a different indicating color serves as a visually notification. And when connected to XPG PRIME software, the lowest DPI step can be adjusted to 100. The number of DPI steps can also be changed ranging from one to six, depending on your preference and gaming habit.
يعرف CPU-Z كبرنامج من أكثر برامج معلومات نظام الكمبيوتر كلاسيكية، المعلومات ذات الصلة حول
اختبار جهاز الكمبيوتر الحالي:
النوع: أنواع وحدات الذاكرة
الحجم: إجمالي سعة الذاكرة المثبتة على الكمبيوتر.
القناة: عدد القنوات المستخدمة في عمليات وحدة الذاكرة. في المثال، عدد القنوات هو 4، مما يعني أن
النظام يجمع عرض النطاق الترددي لأجهزة الذاكرة الأربعة لزيادة أداء الإرسال.
قطعة التسنينات
تردد DRAM: سرعة تشغيل تصنيف الذاكرة.
نسبة FSB و DRAM: نسبة تردد الناقل الأمامي (FSB) وتردد ذاكرة DRAM
معايير توقيت RAM (CL، tRCD، tRP، tRAS، tRFC، CR): يمثل كل معيار من المعايير الستة على حدة دورة التردد المطلوبة لمختلف عمليات DRAM.
ALPHA mouse battery consumption is calculated based on an average time of continuous drain with LEDs turned on showing a standard colored effect. That translates to charging once to twice a month with average daily use, depending from the effect used. When LEDs are turned off, the 900mAh rechargeable lithium battery can reach over 120 hours of continuous operation in optimal environmental conditions.
خطوات الاختبار بدون تمهيد:
1. تحقق من أن مواصفات متطلبات النظام (SRS) تدعم بعضها البعض. (وحدة المعالجة المركزية واللوحة
الأم وذاكرة DRAM ومصدر الطاقة)
2. تحقق من توصيل الطاقة ، إذا لم يكن هناك طاقة، فقد يكون مصدر الطاقة معطل، أو توجد دائرة قصيرة
في لوحة الحماية.
3. إذا كان صدر صوت تحذير BIOS بعد بدء تشغيل النظام فيرجى الرجوع إلى الشركة المصنعة لـ
BIOS لإصلاح الأخطاء.
4. إذا كان الكمبيوتر موصلاً بالطاقة بدون صوت تحذير BIOS ، فيرجى استبدال وحدة المعالجة المركزية أو اللوحة الأم أو الذاكرة بالترتيب إلى أن يبدأ النظام في التشغيل.
When setting all LEDs on XPG ALPHA to white color at its maximum luminosity, all segments of a single LED are turned to maximum, which inevitably consumes 2-3x times more than standard operation in color mode or about 5x times more consumption than keeping LEDs off when operating in wireless mode.
إذا قمت بتركيب مجموعة متنوعة من العلامات التجارية المختلفة لبرامج التحكم في RGB على جهاز الكمبيوتر فقد يتسبب ذلك في تعارض موارد أوامر SMBUS الخاصة بالبرنامج ، مما يؤدي إلى فشل التحكم في تأثيرات الإضاءة بشكل طبيعي. يوصى بتركيب برنامج تحكم RGB واحد فقط في جهاز الكمبيوتر.
ج: للتبديل إلى برنامج اللوحة الأم للتحكم في إضاءة ARGB اضغط مطولا على زر LED بلوحة الدخل/الخرج لمدة 5 ثانية، وانتظر ظهور وميض. اضغط مرة أخرى للرجوع إلى التحكم في لوحة الدخل/الخرج.
قد يكون ظهور الشاشة الزرقاء ناتجًا عن عدة أسباب؛ قد تؤثر مكونات الجهاز على أجزاء منه بما في ذلك ذاكرة RAM واللوحة الأم والقرص الصلب ومصدر الطاقة. للتحقق مما إذا كانت مشكلة في ذاكرة RAM أم لا ، يوصى باستخدام برنامج اختبار ذاكرة RAM: Memtest86+. إذا ظهرت رسالة خطأ حمراء فهي بالتأكيد مشكلة DRAM، ويرجى الاتصال بوكيل خدمة العملاء.
بعد التأكد من تركيب وحدة الذاكرة المناسبة للنظام يرجى اتباع الخطوات التالية:
1. أوقف تشغيل جهاز الكمبيوتر، وافصل مقيس الطاقة.
2. حسب مخطط اللوحة الأم أعد إدخال وحدة الذاكرة بأقصى سعة في المقبس الأول ، ثم أعد وضع وحدة الذاكرة بالسعة الأصغر بترتيب تنازلي. تأكد من تركيب وحدة الذاكرة بشكل صحيح ، ثم قم بمحاذاة كل DIMM مع فتحة الموصل عن طريق محاذاة الحز في DIMM مع السن الموجود في الموصل. بعد ذلك ، ادفع وحدة الذاكرة بثبات في الفتحة حتى تثبت في موضعها.
3. تأكد من توصيل جميع الكابلات في الكمبيوتر بشكل صحيح. تأكد من توصيل موصل الطاقة المطلوب جيدًا باللوحة الأم، وتجنب فصل أي كبلات متصلة بالقرص الصلب عن طريق الخطأ.
4. بعد تثبيت وحدة الذاكرة الموصى بها بشكل سليم، ولكن الكمبيوتر المحمول لا يقوم بإعادة التمهيد أو اختيار وحدة الذاكرة ، قد يلزم تنزيل أحدث BIOS من موقع الشركة المصنعة للكمبيوتر المحمول على الويب.
XPG XENIA 15 KC has a battery protection design to prevent the loss of battery life over time due to constant charging and discharging cycles, in order to help lengthen the lifespan of your notebook.
In case the adapter is being plugged in when battery capacity is already over the default 90% value, the system will prevent charging the battery further. If you want to charge your battery up to 100%, please plug your AC when the battery is below 90% capacity.
Users can set different battery charging limits for their notebook by using Intel® NUC Software Studio that comes preinstalled with all Xenia 15 KC notebooks.
If your notebook stops charging even when the battery has fallen below 90%, check the battery charge limit setting in the Intel® NUC software studio as indicated in the sample picture below for any manual setting change.
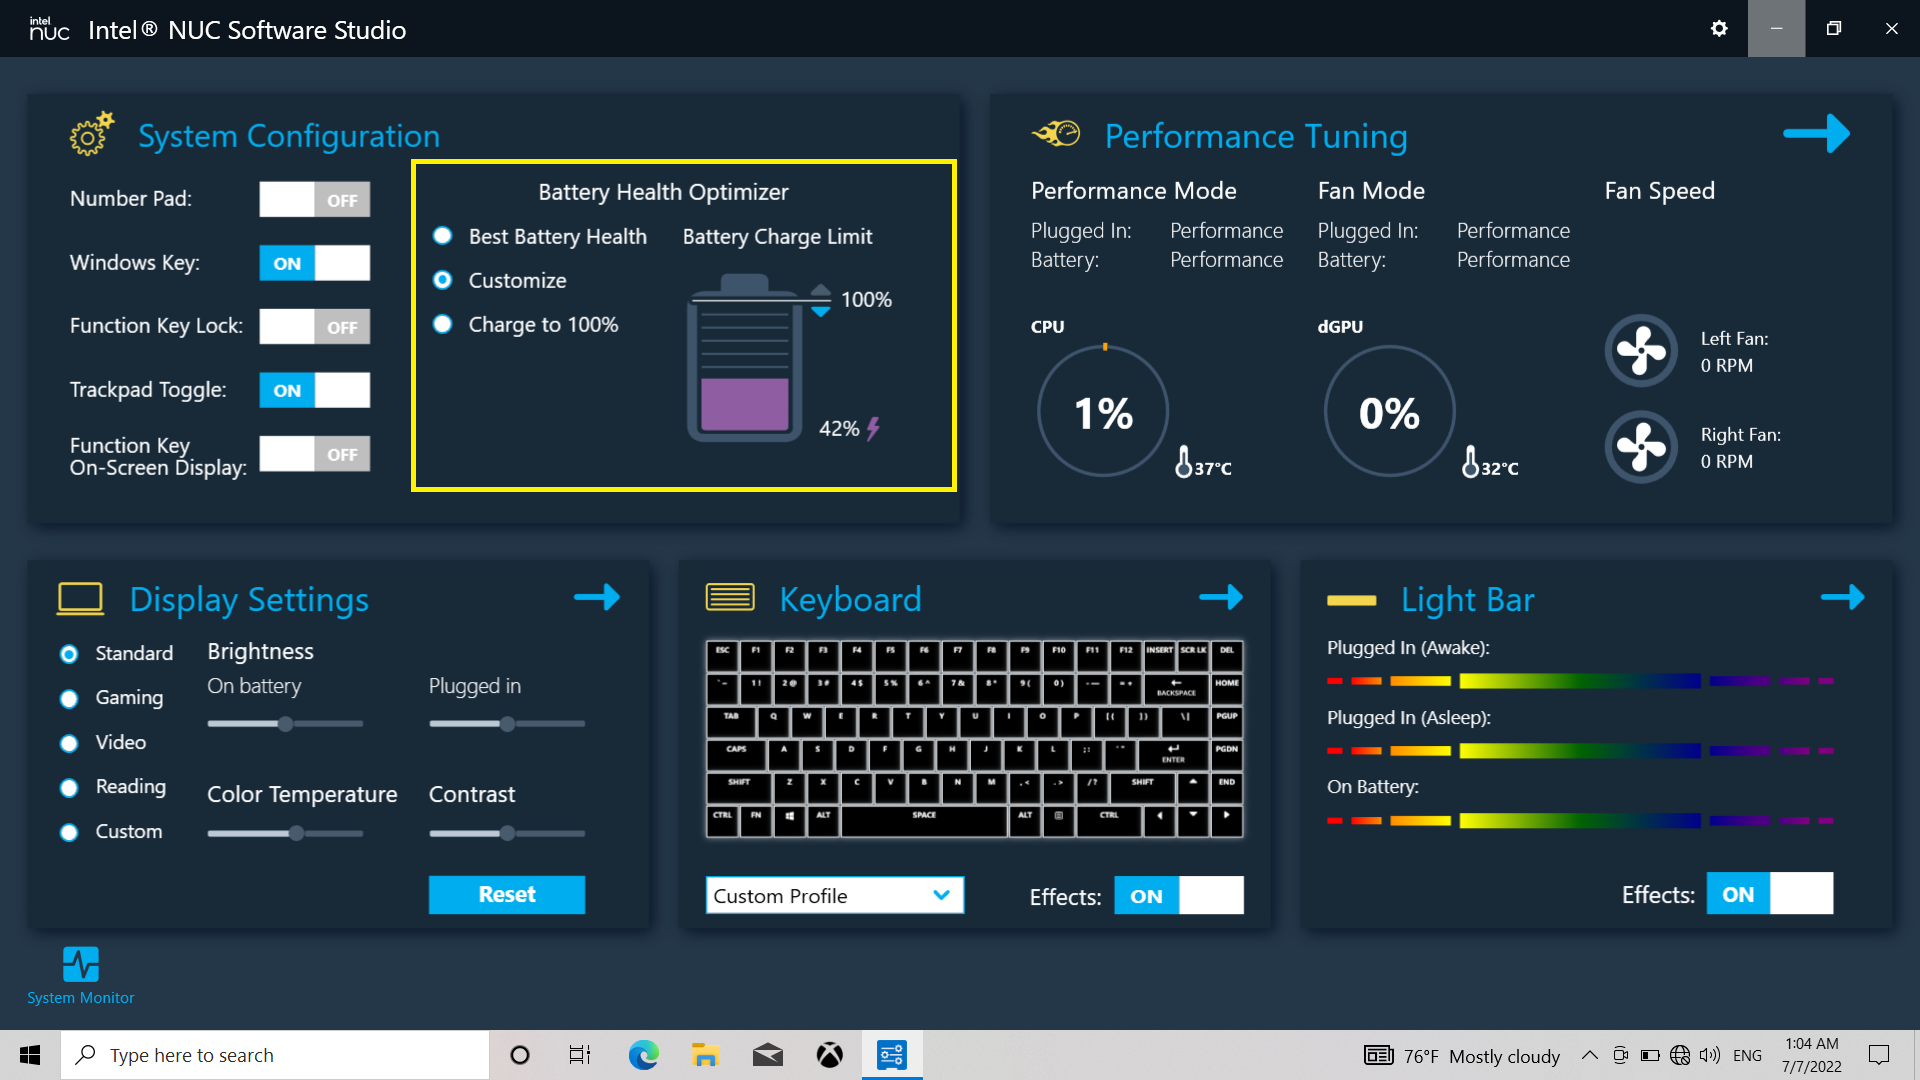
If you have uninstalled Intel® NUC Software Studio, you can still download it separately from XPG Xenia 15 KC download page.
1. تأكيد مواصفات متطلبات النظام (وحدة المعالجة المركزية واللوحة الأم وجهاز الذاكرة)
2. بالنسبة لنظام Intel الأساسي يرجى تحديد خيار تحميل BIOS لوحدة XMP.
3. بالنسبة لنظام AMD الأساسي يرجى تحديد خيار تحميل BIOS لوحدة AMP.
(لا تعطي جهات تصنيع اللوحات الأم نفس الاسم دائمًا لخيارات رفع تردد التشغيل. الأمثلة كالتالي: تطلق MSI DDR4 اسم A-XMP و ASUS اسم D.O.C.P.)
Please follow the steps below to upgrade your XENIA Xe to Windows 11.
1. Check your BIOS version first. If your current BIOS version is under BCTGL357.0064, please upgrade your BIOS version to 0064. You can check your BIOS version by pressing F2 during boot-up.
BIOS 0064:
https://bit.ly/Xenia_xe_bios_update_v_0064
2. When you successfully upgrade your BIOS to version 0064, please download and upgrade your BIOS to BCTGL357.0071. The BIOS version 0064 must be installed prior to upgrading to version 0071.
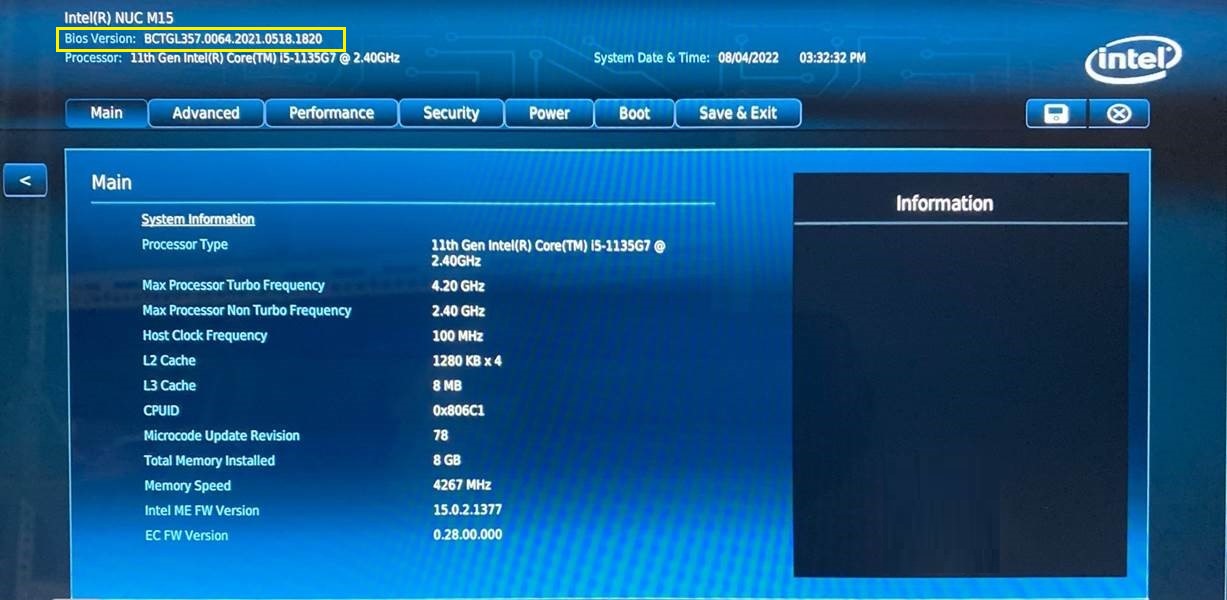
BIOS 0071:
https://bit.ly/Xenia_xe_bios_update_v_0071
3. After you upgrade your BIOS from 0064 to 0071, you can now upgrade your XENIA Xe to Windows 11.
يرجى اتباع الخطوات التالية للتحقق:
1. قم بتحديث النظام إلى أحدث إصدار من BIOS.
2. ركِّب وحدة G4.
3. بالنسبة لمنتجات رفع تردد التشغيل ، يرجى ضبط BIOS على XMP أو EXPO أو DOCP.
4. قم بتشغيل برنامج Memtest86 + (Memtest86 + ( http://www.memtest.org/)) - وهو برنامج اختبار RAM مجاني.
5. عندما تكون نتيجة اختبار جهاز كمبيوتر واحد طبيعية قم بتركيب وحدة القناة المزدوجة، وتشغيل الاختبار.
قد يلزم تحديث BIOS باللوحة الأم أو إصدار برنامج RGB أحدث:
لإصلاح المشكلة قم بما يلي:
1. قم بتنزيل أحدث BIOS للوحة الأم أو تحديث الموجود.
2. انتقل إلى قسم البرامج أو منطقة التنزيل في صفحة الويب الخاصة باللوحة الأم، وقم بتنزيل أحدث إصدار من برنامج
RGB
3. قم بالتثبيت كمسؤول عن النظام.
برامج RGB التالية مدعومة:
ASUS Armoury Crate (Aura Sync)
MSI Center(Mystic Light)
Gigabyte Fusion APP
ASRock Polychrome SYNC APP
يرجى أولاً التأكد مما إذا كنت ضبطت SSD كقرص افتراضي (Control Panel>System and Security>Storage Spaces). يتعذر على Toolbox اكتشاف قرص افتراضي. يمكنك حذف القرص الافتراضي على Storage Spaces "مساحات التخزين" أو تنسيق SSD وبدء تشغيله في Disk Management "إدارة القرص". سوف يتعرف Toolbox على SSD بعد ذلك.
تجد إرشادات التثبيت الموصى بها هنا .
The image is not permanent. Please refer to the official Intel® NUC laptop image retention removal guide for help.
يرجى استخدام Intel NUC Software Studio المدمج لتعطيل وظيفة "قفل عند عدم التواجد"، بعدها لن تدخل الشاشة في وضع السكون أبدًا.
ج: أولاً، يرجى الرجوع إلى دليل مستخدم النظام خاصتك للتأكد من أن المشكلة لا تتعلق بالجهاز المضيف أو الجهاز. وننصحك بالقيام ببعض إصلاحات الأعطال الأساسية على مستوى البرنامج. استخدم صندوق أدوات SSD للتحقق من حالة SSD خاصتك، ثم توجه إلى "Utility" في الشريط الجانبي الأيسر وحدد "Firmware Update" للتحديث. ما أن يكتمل التحديث، أعد تشغيل نظامك - وهذا يمكن أن يساعد على حل المشاكل العرضية مثل هذه.
هام: قبل تحديث البرنامج الثابت، تأكد من نسخ بياناتك القيمة نسخًا احتياطيًا وإبقاء النظام متصلاً بالكهرباء طوال عملية التحديث لتفادي فشل التحديث.
لا, التوصيل الفوري غير مدعوم. إذا كنت تود تعديل ترتيب المروحة أو تغيير عدد المراوح, فأوقف دائمًا تشغيل الطاقة أولاً. والإخفاق في القيام بذلك قد يؤدي إلى حدوث تلف.
تأكد من أن كل المراوح مركبة تمامًا قبل توصيل الطاقة ومؤشر LED باللوحة الأم. أوقف دائمًا تشغيل طاقة الحاسوب الشخصي قبل القيام بأي توصيلات لتفادي أي مشاكل محتملة.
حكمة الأداء, هما متماثلان مع وجود اختلاف في توصيل الأسلاك والتغليف.
يعد كبل 12V-2x6 إصدار محدث من كبل 12VHPWR, ولكن كلاهما يشتركان في نفس التصميم وتوفير الطاقة؛ حيث يدعمان بطاقة حتى 600 وات. وهما متوافقان تمامًا مع بعضهما البعض؛ مما يعني أنه بغض النظر عن أي منها سيأتيكم مع وحدة الإمداد بالطاقة, فسيظل بإمكانه دعم أحدث وحدات معالجة الرسومات العالية الطاقة
وحدات الإمداد بالطاقة التي تتميز بتصميم دائرة تيار مباشر -تيار مباشر هي XPG FUSION وXPG CYBERCORE Series وXPG CORE REACTOR Series وXPG PYLON.
وحدات الإمداد بالطاقة التي تستخدم المكثفات اليابانية هي XPG FUSION وXPG CYBERCORE Series وXPG CORE REACTOR Series وXPG PYLON.
تسلسل الإجراءات الموصى به هو:
1 - تأكد من أن الكبل مستقر بشكل سليم على كلا الطرفين وأن الموصلات مقفولة ومتوازية بشكل صحيح. جرب فصل الكبل وإعادة توصيله، مع التأكد من أن الكبل خالٍ من الالتواءات وبه عروة طبيعية بدون طي الكبل أو شده.
2 - جرب فتحة PCIe مختلفة وتحقق مرتين من أن الفتحة التي تستخدمها ممكنة من إعداد BIOS من أجل تحقيق مسارات PCIe كافية لجهازك. وأيضًا تحقق من وجود خيار وضع نقل PCIe لضمان أنه تم اختيار الجيل المناسب من إصدار PCIe الذي يرضي كل من جهازك واللوحة الأم.
3 - ابحث عن تحديثات Bios الأحدث من خلال بائع اللوحة الأم خاصتك.
4 - حدث الشريحة ومشغلات وحدة معالجة الرسوميات على أحدث ما يتوفر وتأكد من أن نظام التشغيل لديك محدث ولا تعلق أي تحديثات في الخلفية.
5 - في حال استمرار المشكلة، يرجى الاتصال بخدمة دعم XPG على xpg.com/en/support لمزيد من الإرشادات.
الكبل الرافع المضمن في بعض تهيئات Invader X مصنوع من مواد عالية الجودة وتم اختباره ليتحمل معدلات النقل التي تصل إلى 16 جيجا/الثانية بموجب مواصفات PCIe Gen4.
وعلى الرغم من أن XPG اختبرت مجموعة متنوعة من توفيقات وحدات معالجة الرسوميات/اللوحات الأم بدون وجود مشاكل, فلقد رأينا تقارير محدودة من المشاكل العرضية مع توفيقات وبائعين معينين.
وهذه المشاكل قد تتضمن عدم التعرف على بطاقات وحدة معالجة الرسوميات أو عمليات التجميد العرضية. على وجه الخصوص، يوجد عدد محدود من اللوحات الأم AMD Ryzen في الشريحة من سلسلة B550, B650 وA620 مشاكل عند إقرانها مع وحدات معالجة رسوميات عالية الجودة من الجيل الأحدث؛ نتيجة خيارات التصميم ومستويات تحمل بعض موصلات PCIe.
يُرجى تجربة الخطوات التالية بالترتيب:
1. إعادة تعيين PRIME إلى الوضع الافتراضي
حرّك الماوس إلى الزاوية العلوية اليمنى لـ XPG PRIME. مرر مؤشر الماوس فوق "مرحبًا أيها الضيف" للكشف عن وظيفة "إعادة التعيين". انقر فوق الزر "إعادة تعيين" لإعادة ضبط برنامج PRIME على الإعدادات الافتراضية.
2. إعادة تعيين لوحة المفاتيح أو الماوس إلى الوضع الافتراضي
لوحة المفاتيح: اضغط مع الاستمرار على FN + ESC لمدة 5 ثوانٍ.
ماوس Slingshot: اضغط مع الاستمرار على زر الأمام + زر الخلف + زر DPI لمدة 5 ثوانٍ.
3. أدخل قائمة الإعدادات وتحقق من كل من البرامج الثابتة للمنتج وإصدارات PRIME. إذا لم يكن أي من البرنامجين الثابتين هو أحدث إصدار متاح، فيُرجى التحديث إلى أحدث إصدار.
4. إذا استمرت المشكلة، فيُرجى الاتصال بنا وتقديم المعلومات التالية:
البرامج الثابتة للمنتج وإصدارات PRIME.
صور / مقاطع فيديو للمشكلة.
كيفية إعادة إنتاج المشكلة (السيناريو أو الخطوات).