


Show 182 matching result
Yes. Selected XPG chassis are designed to support all major reverse-connector standards — including ASUS BTF, GIGABYTE PROJECT STEALTH, and MSI PROJECT ZERO.
Most recently, we’ve ensured compatibility with GIGABYTE’s newly released reverse-connector motherboards, giving builders more options for clean, cable-free setups.
PRIME BOX can support up to 4 PWM fan connections per each header, with a total current of up to 1 ampere on each port, and 90 LEDs per ARGB LED channel, with a total current of up to 2 amperes per port. However we recommend to limit the maximum draw to 8 ampere in total from the SATA power connector.
If you are unable to view temperature measurements in the thermal control tab, please close XPG PRIME software and restart it by right-clicking the app and selecting the "Run as administrator" option. This should make the temperature display appear correctly.
If you connect ARGB components with varying numbers of LEDs to a single header and want to customize settings for each LED, please select "model > customized" and enter the larger number of LEDs in the blank box under the "number of LEDs" option. Then, turn on Canvas and you may control each LED individually.
The PRIME software is essential for adjusting the lighting. You have 3 options to set lighting effects:
1. Showroom screen:
Choose your preferred preset lighting options. All connected ARGB components will synchronize with the selected lighting effect simultaneously.
2. Connected Device- Lighting Section:
In the lighting section, you can customize the preset lighting for each ARGB port.
3. Canvas Mode:
You can create a custom lighting effect for each LED.
Currently some of the newer AMD Chipsets are showing an issue in the way they handle Human Interface Device interface (HID.dll) differently from other platforms. This interface is required by Canvas mode to address all LEDs independently for rendering complex lighting effects designed by the user directly.
The issue has been escalated and under investigation. We are expecting that future version of the generic AMD chipset driver will solve this issue and this information will be updated as soon as a solution is made available.
Please note that the main menu and the “Connected Devices” menu are not affected by the issue, so PRIME BOX still has full functionality available on AMD platforms for Thermal Management and Lighting Control.
XPG PRIME software offers 1 main functions: to set up Lighting.
User can quickly change the lighting effect with presets, or advance to more detailed settings such as individual lighting sectors and brightness on the mouse.
The original launch version of the XPG SUMMONER firmware did not support software controls aside what was preprogrammed via key shortcuts. That changed with the release of firmware update v1003. Now, you're no longer required to remember cumbersome shortcuts to record macros or assign static colors via profiles. This is because all such functions are now handled via the XPG PRIME ecosystem management software.
- XPG PRIME provides several ways to assign lighting effects with different levels of customization; including the ability to design your own effects per each LED, or instantly apply changes to the entire color layout with simple one-click selection options.
- It provides a highly customizable Macro Editor, enabling users to create up to 50 sets of macros and bind each one to 128 different keys.
- You can also now customize your own shortcuts. Please note that all available default non-customized keyboard shortcuts are highlighted on the keyboard when you hold down the function (fn) key.
Click the following link to download the latest available version of XPG PRIME ecosystem management software.
For detailed information about upgrading to Windows 11, please visit the Microsoft Website.
According to the definition of Power Delivery, the output of Type-C must be 10-100W. Notebooks with Thunderbolt 3 or higher specifications can support 5V/3A PD charging.
All Xenia laptops are pre-activated at the factory during production. There is a known Microsoft issue that has been resolved when running by updating to the latest Cunulative Update via Windows Update function from Control Panel.
Japanese manufacturers are a leader in the development of new water-based electrolyte systems with enhanced conductivity; and they produce the most reliable and best-performing products.
We build our own memory modules, starting from cutting wafers and all the way through packaging and board mounting. For XPG Xenia we handpicked only the best parts of wafers to put in your notebook.
We do try to provide the best possible configuration to future-proof your notebook. However, there is an unpopulated M.2 SSD slot in the unit that can be used to increase storage capacity. You can check the Quick Start Guide provided with the unit for installation instructions. If you add a second drive, you could also decide to implement Raid 0 mode via BIOS setting in the advanced menu, but Raid configurations are more error prone so make sure you have constant backups.
Preinstalled SO-DIMM memory modules can also be replaced as well for future upgrades. BIOS currently could also support 64GB in 2x32Gb configuration if you wish.
Note: Any damages or issues caused during installation or as a result of incompatible parts being used is not covered under warranty and may void the coverage. XPG will not be liable for any damage from or to third-party components that you may install, and cannot guarantee compatibility or performance aside from adhering to industry standards.
WIFI 6 offers greatly reduced latency (up to 75% reduction) when connecting, and increased gigabit speeds up to ~1700 Mbps when paired with compatible wireless routers that supports 802.11ax and 160Mhz channel bandwidth. Those speeds may vary greatly based on local traffic, your internet provider’s bandwidth and the wireless router itself.
As with the vast majority of Gaming Notebooks, XPG XENIA is designed to maximize performance, therefore it is not recommended to be used directly on your lap. While our touch temperatures are within range of safety, it is still recommended to avoid direct contact and it is suggested to use a base in between instead, especially for longer period or when operating under Performance Mode, as XPG XENIA may get uncomfortably hot. Additionally, consider that air intakes at the bottom of your device should not be blocked at all time, as reducing cooling airflow may push the device to be warmer and even trigger a shut down if not enough fresh air is drawn in to cool the system.
If your system does not turn on after installing the power supply, please follow the troubleshooting guide listed below:
1. Make sure the AC main power cord is connected to your PC correctly.
2. Please make sure the AC source is switched On
3. Please make sure the AC On/Off switch on the back panel of the power supply unit in the “I” (On) position.
4. Please make sure the MB & CPU Power Socket & connectors are connected correctly on the Motherboard.
5. If you still have problem turning on your PC, please contact ADATA Tech Support, Service Center or your local dealer.
.NEVER, under any circumstances, open the power supply unit or attempt to repair the power supply yourself. This is extremely dangerous due to the high voltage.
.DO NOT insert any objects into the fan grill or the ventilation area of the power supply unit.
.DO NOT place any objects in front of the fan or the ventilation area of the power supply unit that may obstruct or restrict the airflow.
.USE ONLY the modular cables bundled with the power supply unit. DO NOT use any third party cables or extension cables with this unit.
.Avoid dust, humidity, and temperature extremes. Do not place the power supply unit in any area where it may become wet.
.The power supply unit is for integration into a computer, and not intended for external or outdoor usage.
.Failure to comply with any manufacturer instructions and/or any of these safety instructions will immediately void all warranties and guarantees.
The heat conducted from the CPU via the large diameter copper plate is transferred to the cooling fluid. The liquid is then pumped through the thin skived fins on the copper plate by the ultra-quiet pump. As the liquid passes through the aluminum radiator channel, the heat is further dissipated by the fans. The cooled liquid is then pumped back to the copper plate to recycle the process.
XPG LEVANTE is filled with low-evaporation coolant rated with a 50;000 hours lifespan. You will never have to worry about refilling the coolant.
The XPG LEVANTE is build and tested to ensure leakage doesn't occur.
XPG LEVANTE is designed to synchronize with ASUS Aura Sync, GIGABYTE RGB Fusion, MSI Mystic Light Sync and ASRock Polychrome. If your motherboard has a 5V addressable RGB header, you can control the lighting effect through the respective software. For more details, please refer to the motherboard manufacturer’s website.
The XPG LEVANTE supports Intel 1366; 115x ; 2066; 2011 and AMD AM4 socketsXPG LEVANTE support Intel 1366; 115x ; 2066; 2011 and AMD AM4 sockets.
XPG XENIA provides an approved preset called “Performance mode” that pushes the limit of the laptop by boosting wattage of both GPU and CPU to the limit of the thermal solution, trading off an increase of fan noise and touch temperatures to increase power. This option is available via its dedicated button next to the power button or via XPG Prime software configuration.
While you should have a bit of fun, remember that heavily manipulating voltages for logical parts using third party tools may result in shorter lifespan of your unit and in some cases may even void warranty.
BTW, the Laptop is already slightly undervolted by factory default to improve performance and reduce throttling.
XPG Primer features three polling rates, 250Hz (blue), 500Hz (green), and 1000Hz (red). To change polling rates, hold down the right button and scroll wheel together for 3 seconds. Light will flash to indicate that the new adjustment has been stored successfully.
XPG Primer has 6 DPI settings. Default is 800 DPI. To change the setting during gameplay simply press the DPI button right underneath the scroll wheel. When the new setting is being stored in the internal memory the light will flash 3 times to indicate that the new setting has been saved as default
The XPG PRIMER has 3 light effects. Default effect is color wave. If the light is turned off, you can press the RGB setting key to check and change the current light setting.
You can select RGB effects with the dedicated RGB button located below the scroll wheel, under the DPI Selector.
No, XPG XENIA does not support INTEL XMP, which is not included in Gaming class H family processors.
We have enabled recovery functionality by default, which is accessible by pressing F9 during boot when the XPG logo appears. As such, we also partitioned the drive in two logical units, so that you can perform a recovery operation on the C: volume without blowing your data left on the D:.
You can use Disk management tool if you prefer to remove the D: partition and Resize the logical drives. Removing the recovery partition, although not recommended, is also feasible and you can easily find instructions in forums online if you require the extra space.
Software applications and updated firmware are available on XPG XENIA’s official product website in the download area. Drivers are automatically updated via Windows Update as per Windows 10 requirement.
XPG PRIME (beta) is an XPG flavored control center software for XPG XENIA laptops. It allows you to adjust RGB lighting effects of the keyboard and front light bar, tweak power modes (Performance, Standard and Battery Saver, including changing fan profiles for acoustic performance) as well as monitor your hardware usage.
The software also enables an On-Screen-Display for the available shortcuts via Function Keys.
This version is specific for notebooks only, hence the beta marking. It is also a separate development effort from the XPG PRIME ecosystem application that supports other XPG devices.
XPG PRIMER was designed mainly for casual gamers that want a good mouse with all ley functionalities and for those who are approaching gaming mice for the first time. The mouse was created with simplicity in mind without falling short on a durable high quality build. It was sculpted for right-handed users and the curves have been studied to be adaptable well for all types of grips on small and medium sizes hands. Larger hands are also suitable for fingertip grips. The raised center ridge on the buttons is ideal to help finding immediately an optimal curvature for fingers and to apply an ideal pressure for rapid and precise clicks.
As most mice, just connect the XPG PRIMER to your device via its USB port and your OS will automatically recognize the mouse within the built-in USB HID driver.
Please only use the modular cables bundled with the power supply unit. DO NOT use any third party cables or extension cables.
There are two light strips on the mouse pad; you can select the light strip you would like to control; you can also select both light strips.
Step 1- Double click the control button to select the light strip.
Step 2- The selected lighting strip will flash; you can also select both light strips; in which case both will flash.
Step 3- Click the control button to change the lighting color/effect.
No; you can setup the lighting through the control box on the top left hand corner. (refer to question 5)
XPG BATTLEGROUND XL PRIME comes with Micro-USB to USB cable. This provides power for the LED lighting
Please roll XPG BATTLEGROUND XL with the printed side facing outward and the rubber side facing inward.
Windows 7/8/10 have a built-in screenshot function called
CORDURA® is a collection of fabric technologies used in a wide array of products including luggage; backpacks; trousers; military wear and performance apparel. Cordura fabrics are durable and resistant to abrasions; tears and scuffs.
Please use a clean damp cloth to clean the product properly. Do not use any soaps or solvent agents on the mouse pad surface to preserve its integrity.
CHERRY MX switches are the absolute industry benchmarks; developed and manufactured in Germany.
XPG SUMMONER accessories include a magnetic wrist rest; additional nine red keycaps (WASD; four arrow keys and ESC) and a keycap puller.
XPG INVADER can accomodate radiators up to 360mm in front; 240mm radiators on the top and side; and 120mm radiators at the back.
Please consult the USB 3.0 connection section on your motherboard's manual.
You can install two SSD behind the motherboard tray in the 2.5" hard drive bracket and two SSD in the hard drive brackets under the PSU cover. Note, when you install four SSD’s you will forgone space for 3.5" hard drives.
You can install up to eight fans on the XPG BATTLECRUISER. If your RGB fans has a 3pin or 4pin RGB header; it can be controlled with XPG PRIME CONTROLLER on the front I/O panel. You can find installation instructions here.
Yes; the XPG BATTLECRUISER has two USB 3.0 ports and a USB Type-C port on the front I/O panel.
XPG BATTLECRUISER comes with four ARGB fans; three in the front and one in the back.
The XPG BATTLECRUISER can support graphic cards up to 400mm in length.
XPG BATTLECRUISER supports E-ATX; ATX; Micro ATX and Mini-ITX motherboards.
XPG BATTLECRUISER can accomodate radiators up to 360mm in the front; 360mm on the top and 120mm at the back. Please note you cannot install two 360mm radiators at the same time.
The XPG INVADER supporst ATX; Micro ATX and Mini-ITX motherboards
The XPG INVADER supports graphics cards up to 400mm in length. Be sure to confirm the size when purchasing a graphics card.
XPG INVADER comes with two black fans; one in the front and one in the back.
XPG SUMMONER offers onboard lighting effects, and via XPG PRIME software there are more lighting effect options available for gamers to customize.
Default lighting effects:
-Press FN + UP/DOWN arrow key to adjust the lighting brightness.
There are 5 brightness levels in the following sequence: OFF / 25% / 50% / 75% / 100%
-Press FN + LEFT/RIGHT arrow key to choose a lighting effect
There are 7 predefined Lighting effects in the following sequence: Static / Breathing / Trigger / Explosion / Color Cycle / Color Wave / WASD mode
-For more information please visit【XPG SUMMONER How-to Video】How to adjust the RGB lighting effects on XPG SUMMONER-https://youtu.be/PYBUw98xt2E
Please use a clean damp cloth to clean the product properly.
Do not apply any soap or solvent agent on the surface to preserve its integrity.
Under the normal mode, Windows key can be disabled or abled by pressing “FN” + “WINDOWS” key. Windows key is disabled by default when gaming mode is on, including when under any gaming profiles and cannot be activated.
【XPG SUMMONER How-to Video】How to disable Windows key- https://youtu.be/8jcuvNVPiAI
Under the normal mode; the static color is red of your XPG SUMMONER. Static colors are assigned by default to each gaming profile as follows: Profile 1: blue;Profile 2: indigo; Profile 3: white; Profile 4: green; Profile 5: yellow.
You can install up to nine fans on the XPG INVADER. If your RGB fans have a 3pin or 4pin RGB header; they can be controlled via the XPG PRIME CONTROLLER on the front I/O Panel. You can find installation instructions here.
ADATA in-house SSD production process gives us the ability to hand-craft the modules for these specific units. Only PCIe Gen 4 SSDs with selected top bins of NAND flash and controllers qualify for XPG XENIA Xe.
XPG XENIA Xe comes with a preinstalled 1TB XPG M.2 2280 SSD (PCIe Gen 4). Users can upgrade the storage amount by purchasing a new M.2 2280 SSD and replacing the preinstalled one. No additional M.2 slots are available on this product.
The preinstalled LPDD4x RAM cannot be replaced or upgraded.
XPG XENIA Xe can connect to up to 3 external displays. One via HDMI port and two more via Thunderbolt 4 ports via DP mode.
Wi-Fi 6 is the latest generation of wireless protocol that delivers greatly reduced latency (up to 75% reduction) when connecting and increased gigabit speeds up to ~1700 Mbps.
To take full advantage of this new technology, make sure to use a compatible wireless router that supports 802.11ax and 160Mhz channel bandwidth. Those speeds may vary greatly based on local traffic, your ISP’s local capability, and the wireless router itself.
XPG XENIA Xe can operate for up to 16 hours in Battery Saver mode when WIFI is turned off and luminosity is set to low. Depending on the settings and function, you can expect an average of 12 hours in Battery Saver mode.
Spare power adapters will be available to purchase from the XPG online store soon. XPG also has a line of backpacks that are great for transporting your notebook and any other related gear you need to bring when you travel.
XPG also offers a number of high quality peripherals such as headsets and mice.
XPG XENIA Xe’s default Windows 10 image was kept as clean as possible with no bloatware and the absolute minimum number of necessary configuration applications.
Aside from Windows 10 and drivers, the only additional software included are a set of preloaded XPG wallpapers, Intel NUC Software Studio, and Intel NUC Audio Studio. All systems are factory activated. As the OS comes standard with Xbox Game Pass for PC, XPG provides one free month of the service for first time subscribers. Please note the month of service does not start until you manually activate your subscription.
Yes. XPG XENIA Xe comes with a built-in microphone array and a front lightbar that can be associated with multiple smart assistants. Compatability may vary by software and region.
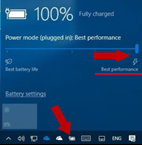
Windows 10’s default performance setting is in the middle of Best Battery Life vs. Best Performance. To increase performance quality, click the battery icon at the bottom right corner and manually slide the performance bar towards the Best Performance (right) side while gaming or during any CPU/GPU intensive application.
It comes standard with 1 year of warranty protection
(warranty may vary by different regions).
Due to current supply chain limitations, XPG XENIA Xe is only available in USA, Mexico, and Latin America during the initial launch period. As production continues, this product will be made available in other countries over time. We apologize for the inconvenience.
ADATA's in-house SSD production process gives us the ability todevelop modules for specific systems. Only PCIe Gen 4 SSDs with selected top bins of NAND flash and controllers qualify for the XPG XENIA 14.
The XPG XENIA 14 comes with a preinstalled 512GB XPG M.2 2280 SSD (PCIe Gen 4). Users can upgrade the storage by purchasing a new M.2 2280 SSD and replacing the preinstalled one. There is also an unpopulated m.2 PCIe Gen 3 slot available for users to upgrade.
The preinstalled 16GB XPG Gammix SO-DIMM only occupy a single slot and the user has the option to add another SO-DIMM DDR4 RAM on the unpopulated slot.
XPG XENIA 14 can connect to up to three external displays. One via HDMI port and two more via Thunderbolt 4 ports via DP mode.
Wi-Fi 6 is the latest generation of wireless protocol that delivers greatly reduced latency (up to 75% reduction) when connecting and increased gigabit speeds up to ~1700 Mbps.
To take full advantage of this new technology, make sure to use a compatible wireless router that supports 802.11ax and 160Mhz channel bandwidth. Those speeds may vary greatly based on local traffic, your ISP’s local capability, and the wireless router itself.
XPG XENIA 14 can operate for up to 10 hours in Battery Saver mode when WIFI is turned off and luminosity is set to low. Depending on the settings and usage scenario, your actual battery life may vary.
Spare power adapters will be available to purchase from the XPG Online Store soon. XPG also offers a lineup of backpacks that are great for transporting your notebook and any other gear you need to bring when you travel.
XPG also offers a number of high-quality peripherals such as headsets and mice.
XPG XENIA 14’s default Windows 10 image was kept as clean as possible with no bloatware and the absolute minimum number of necessary configuration applications. Aside from Windows 10 and drivers, the only additional software included are a set of preloaded XPG wallpapers and XPG PRIME Lite control center. All systems are factory activated. As the OS comes standard with Xbox Game Pass for PC, XPG provides one free month of the service for first time subscribers. Please note the month of service does not start until you manually activate your subscription.
It comes with a 1-year warranty
(the warranty may vary by regions).
The XPG XENIA 14 was initially launched in the USA and Latin America (including Mexico). As production continues, this product will be made available in other countries/regions over time.
If you have an M.2. 2280 SSD, you can find installation instructions here.
Firstly check the make and specifications of your motherboard on the manufacturers website to see if it has M.2 slots that support PCIe 5x4. If there are two M.2 PCIe 5x4 slots, you can use the direct link to the CPU terminal (center Processor) M.2 socket for better performance.
PCs that do not support PCIe Gen5 SSDs can still use the said SSDs. However, the SSDs performance will be limited to PCIe Gen3 levels.
If you encounter this problem, please refer to your motherboard's user manual or the manufacturer's website. Motherboards vary by model and brand. The type and quantity of I/O ports are not the same; therefore, when a SATA or NVMe M.2 SSD is inserted into the slot, it may be affected by I/O. The sharing of channels by the ports results in a limited number of channels supported by the chipset, rendering some 7pin SATA sockets unusable.
1. Make sure you have already formatted and partitioned your new 2.5" SATA of M.2 SSD. For detailed instructions for Windows 7, please click here; For Windows 8.1 or Windows 10, please click here; For Windows XP, please click here.
2. If your SSD cannot be detected (including unrecognizable, unreadable, etc.) after it has worked normally for a period of time, please follow steps:
M.2 SSD => Loosen the screws and remove the M.2 SSD and check the interface connector for dirt or scratches. Then reinstall it.
SATA 2.5-inch SSD => Unplugged the SATA cable and check the interface connector for dirt or scratches. Then reinstall and ensure the cable is properly plugged in. In some cases, an old cable may cause your SSD to not be detected.
If you have tried the above but the problem persists, the SSD might be faulty. Check your warranty period on ADATA's official website.
Query URL: https://www.xpg.com/en/support/xpg?tab=warranty
If you are still within the warranty period, you can contact your retailer or nearest service center for support.
ADATA Service Center website: https://www.xpg.com/us/support/xpg?tab=services
If it is inconvenient for you to visit a service center for repair, you can apply for online repair at ADATA's website:
https://www.xpg.com/us/member/login
After completing the application, please follow the instructions to properly package the product and then send it to the designated address. After ADATA has received your product, we will begin to process it as soon as possible.
[Important reminder:]
1. ADATA service centers are only responsible for repairing products with malfunctions not caused by the user (the product must have no exterior damage and the stickers must remain intact) The warranty scope and authenticity of the product will be determined by the original factory based on the product received for repair.
2. It is recommended to take photos of the front and back of the product for your later reference before sending it in for repair.
3. ADATA only repairs the product and does not provide data backup services. Please be sure to back up your data. If the data is lost or damaged due to the repair process, the ADATA will not be held responsible.
If you have used the SSD normally before, but then fails to format, please try the following steps:
1. Enter "diskpart" in the command line of the "Start" menu and press "Enter" (or use the "Windows" key and "R")
2. Enter "List disk" and press "Enter" to check the hard disk number (the system disk is Disk 0. If only 1 SSD is connected, it should labeled as Disk 1.)
3. Type "select disk 1" and press "Enter" to select the SSD
4. Type "clean" and press "Enter", the partitions of the SSD will be deleted
Set up RAID 0 on a compatible motherboard, then connect two SSDs of the same specification to the set port. For detailed instructions, please refer to your motherboard's user manual. The performance of the SSD with a RAID 0 configuration will be double that of a single SSD.
ADATA SSDs can use standard drivers, which can be applied to different operating systems; at the same time, users can also install the drivers officially provided by the motherboard manufacturers. If you have other questions, please contact ADATA's customer service center.
Note:
1. NVMe (PCIe) M.2 SSDs require Windows 8.1 or later to support the NVMe driver (it is recommended to update to Windows 10 or later). Linux series such as Fedora, SUSE, Ubuntu, Red Hat are also supported
2. AHCI (SATA) M.2 SSDs are compatible with Windows 7 and later
Since SSDs don't have mechanical drives, so there is no need for defragmentation. Defragmenting an SSD may cause unnecessary wear and tear. SSDs are designed to write data evenly on the entire drive as much as possible, thereby reducing excessive wear on any one location.
ADATA SSDs are designed in accordance with the Serial ATA International Organization standards and have undergone rigorous testing to ensure they work with various operating systems.
Note:
1. NVMe (PCIe) M.2 SSDs require Windows 8.1 or later to support the NVMe driver (we recommend Windows 10 for better the best experience and usability). Linux, including Fedora, SUSE, Ubuntu, and Red Hat, is also supported.
2. AHCI(SATA) M.2 SSDs can be used with Windows 7 or later.
Troubleshoot with the following:
1. The SSD has wear-leveling technology built-in to enhance the product's lifespan. The slower speeds may be due to concurrent reformatting, but this situation is not common, especially when it is not a brand new SSD. Contact our customer service staff for help in troubleshooting.
2. Insufficient free space will also affect the writing speed. You can try to delete files to free up space on your SSD.
This is related to the storage format of your SSD. If using the Windows FAT32 format, the maximum size of any single file is limited to 4GB. To avoid this situation, please change reformat your SSD to NTFS.
HDD Sentinel Health displays anomalies because this tool incorporates the S.M.A.R.T attribute 168 (A8), 159 (9F) fields into the health display, but these two fields are self-defined by each vendor, so these two fields are not associated with health calculations. Please remove the wrong interpretation position of the two fields according to the illustration, and the SSD health can be displayed as normal.
The difference in capacity is mainly due to the different calculation methods used by your PCs operating system and the SSD. SSDs calculate capacity based on the decimal system, e.g.: 1KB - 1000 Byte bytes, 1MB - 1000KB, 1GB - 1000MB, 1TB - 1000GB, and so on; Your PCs operating system uses the binary system, e.g. 1KB x 1024 Byte byte, 1MB x 1024KB, 1GB x 1024MB, 1TB x 1024GB, and so on. For example, if the packaging shows capacity or 500GB, it is calculated as follows: 500GB x 500 x 1,000MB x 1,000KB x 1,000Byte x 500,000,000,000Byte. Your PCs operating system will calculate as follows: 500,000,000,000 Byte/1024KB/1024MB/1024GB, or approximately 465GB.
Remarks: For a faster calculation method, the capacity listed on the packaging can be calculated as x0.93=SSD for approximate capacity
Speeds may vary because different test software use different parameter settings and test methods, and the different testing environments and PC configurations may also have an influence (for example: different motherboards or CPUs, etc.). In addition, the amount of free space, namely lack of, will also affect writing speeds. For better performance, you can try the following:
1. Please check if the slot currently used by the SSD can support the specifications of the SSD. (For example, if a PCIe Gen3x4 SSD is inserted into a PCIe Gen3x2 slot, the speed will be limited by the PCIe Gen3x2 slot)
2. Remove unnecessary software or data from the SSD, or reformat it.
3. Use CrystalDiskMark or ATTO Disk Benchmark to test your SSDs speeds.
4. If your SSDs speed is still slow, please take a screenshot of your SSDs speed test results and send it to our customer service staff for review.
The lifespan of an SSD is based on its health. ADATA's SSD ToolBox is a set of auxiliary software for checking SSD health. In principle, your health will be determined by the length of time you use your SSD and the number of read and write cycles. The longer you use it, the more read and write cycles, the shorter the lifespan of your SSD. Generally speaking, SSDs have wear-leveling technology built-in that helps extend the lifespan of your SSD. However how you use your SSD is the main factors in determining your SSDs lifespan. If a large amount of data is written over a long period of time or if you use your SSD in extreme environments, lifespan may be shortened.
Download ADATA SSD ToolBox: https://www.adata.com/us/support/downloads/
At present, various storage methods, including optical discs, hard drives, and SSDs are not ideal for storing data permanently. Therefore, we recommend that important data be backed up to several different devices to diversify your risks.
According to the Serial ATA International Organization the SATA 3.0 specification offers transfer speeds up to 6Gbps compared to 3Gbps for SATA 2.0. Regardless, SATA 2.0 and SATA 3.0 use the same interface and cables.
SSD TRIM is an Advanced Technology Attachment (ATA) command that enables an operating system to inform a NAND flash solid-state drive (SSD) which data blocks it can erase because they are no longer in use. The use of TRIM can improve the performance of writing data to SSDs and contribute to longer SSD life. Currently, TRIM is used in Windows 7, Server 2008, Mac OS 10.7, and newer versions of Linux. In addition, regardless of operating system, no RAID configuration supports TRIM.
Wear leveling is a process that is designed to extend the life of solid state storage devices. SSDs are store data in blocks. Each block can tolerate a finite number of program/erase cycles before becoming unreliable. For example, MLC NAND flash is typically rated at about 3,000 program/erase cycles. Wear leveling arranges data so that write/erase cycles are distributed evenly among all of the blocks in the device.
DRAM buffer is a function designed to improve the efficiency of reading and writing. Generally, it is composed of 1 to 2 DRAM modules on an SSD. Whether an SSD has a DRAM buffer is often decided by the manufacturer according to its market positioning. Generally speaking, entry-level models do not typically have a DRAM buffer.
XPG CRUISER can accommodate a radiator up to 360mm at front; a 280mm radiator on the top and a 140mm or a 120mm radiator at the back.
There are x3 XPG VENTO 120 ARGB fans pre-installed.
XPG CRUISER can support graphic card up to 350mm in length (without a radiator installed at front). If you wish to install it vertically, please make sure the recommended distance between the graphic card and the PSU chamber is 27mm.
XPG CRUISER supports Mini-ITX, Micro-ATX, ATX, E-ATX, CEB, EEB motherboards.
XPG XENIA 15 KC comes pre-installed with an award winning XPG Gammix S70 1TB SSD which boasts some of the best speeds available at the time of launch. Many other systems may still come equipped with PCI Gen 3 or slower frequencies SSDs, while Xenia 15 KC offers the pinnacle of XPG SSD Research and Development
Dual Rank memory can improve data throughput of 20% to 40% reducing CPU workload and lowering latency, which creates more headroom for an additional burst in performance or for decreased temperatures when less cycles are wasted waiting for memory.
The XPG XENIA 15 KC comes with a preinstalled 1TB high performance XPG GAMMIX S70 M.2 2280 SSD (PCIe Gen 4). Users can expand the storage by purchasing a new M.2 2280 SSD and installing on the spare M.2 PCIe Gen 3 slot or even replace the preinstalled SSD. The preinstalled 16GB x 2 hand sorted dual rank dual channel XPG SO-DIMM memory offer great performance, but can also be replaced to expand up to 64GB of memory.
Every thermal solution will face performance degradation over time. Our liquid metal solution is installed per industry standards and has been designed to offer superior performance and longevity compared to standard thermal paste and is covered to outlast the warranty period.
XPG XENIA 15 KC can connect to up to two external displays. One via HDMI port and one more via Thunderbolt 4 port. This can be further expanded by connecting a Thunderbolt hub with multiple display outputs.
Wi-Fi 6 is the latest generation of wireless protocol that delivers greatly reduced latency (up to 75% reduction) when connecting and increased gigabit speeds up to ~1700 Mbps.
To take full advantage of this new technology, make sure to use a compatible wireless router that supports 802.11ax and 160Mhz channel bandwidth. Those speeds may vary greatly based on local traffic, your ISP’s local capability, and the wireless router itself.
XPG XENIA 15 KC can operate for up to 7 hours in Battery Saver mode when WIFI is turned off and luminosity is set to low. Depending on the settings and usage scenario, your actual battery life may vary.
Spare power adapters will be available to purchase from the XPG Online Store soon. XPG also offers a lineup of backpacks that are great for transporting your notebook and any other gear you need to bring when you travel.
XPG also offers a number of high-quality peripherals such as headsets and mice.
XPG XENIA 15 KC's default Windows 10 image was kept as clean as possible with no bloatware and the absolute minimum number of necessary configuration applications. Aside from Windows 10 and drivers, the only additional software included are a set of preloaded XPG wallpaper, Intel NUC Studio and Intel NUC Audio software. All systems are factory activated. As the OS comes standard with Xbox Game Pass for PC, XPG provides one free month of the service for first time subscribers. Please note the month of service does not start until you manually activate your subscription.
XPG XENIA 15 KC comes with three preset performance modes that can be further customized through INTEL NUC STUDIO software for a personalized operation that fits your user scenario the best. These modes can be quickly and easily switched with the dedicated QUICK MODE BUTTON next to the POWER ON button.

It comes with a 1-year warranty. (the warranty may vary by regions).
The XPG XENIA 15 KC was initially launched in the USA and Latin America (including Mexico). As production continues, this product will be made available in other countries/regions over time.
XENIA 15 KC’s per-key RGB keyboard is specially designed for gamers. The spacious optical-mechanical switch, 2mm short key travel and just 0.2ms ultra-low latency made your fingers fly through and win every battlefield. With 50 million key presses lifecycle, silent and tactile keystroke and anti-ghosting design, you can fast sneak attack every enemy you encounter.
XENIA 15 KC comes with 15.6-inch QHD (2560 x 1440) , 165Hz matte IPS and 300 nits panel that delivers striking gaming visuals. The 85% screen ratio, 4.9mm narrow bezel and 100% sRGB color gamut provide boundless vision with a stunningly immersive experience. You can smoothly opened your laptop with just one hand.
The XENIA 15 KC draws fresh air from inlets located at the bottom of the unit, and expels hot air at the sides and rear, just like the vast majority of Portable PCs.
To ensure efficient heat dissipation, we suggest to avoid placing the XENIA 15 KC on a soft surface and to provide ample space for airflow so your XENIA 15 KC can ventilate properly.
Failure to do so will cause fans to spin longer and louder, and may cause performance degradation or even system shutdown for overheat protection in extreme cases.
When detecting memory modules, PRIME will default to the first module recognized. However, mixing different types of memory modules on the same motherboard is not recommended.
If XPG Prime is unable to detect your memory modules properly, please follow below instructions to troubleshoot.
1. Please close all other lighting effects software (i.e. Asus Armoury Crate/Aura sync, *MSI Mystic Light, Gigabyte RGB Fusion etc.)
*If you wish to use Prime after installing MSI lighting control software, you must uninstall MSI software, turn off the power, and then reboot before installing and enabling Prime.
2. Quit XPG PRIME by right-clicking the PRIME Icon available in the taskbar notification area and relaunch the application.
If the problem persists, please uninstall other applications designed to lock control of the device and fully shut down and turn on your computer.
XPG CYBERCORE’s capacitors are all Japanese, 105℃ rated quality. XPG CYBERCORE PLATINUM power supply uses Japanese capacitors for its reliability in performance and stability. From electrolyte system to conductivity and efficiency, XPG CYBERCORE utilizes high quality material that does not compromise in achieving 80 PLUS PLATINUM efficiency rating.
Yes. However, if an older model is detected that cannot be automatically recognized, PRIME will prompt you and let you select your model from a drop-down menu. Please visit the Prime website to discover more PRIME supported XPG DRAM models
Yes, XPG CYBERCORE does have the design that aims to minimize ripple noise, ultimately minimizes temperature increase and prolongs the power supply’s life expectancy. During the process, the design reduces energy loss, so at 50% load (@ 230VAC) the power supply can perform 94.18%.
Intel users can enables XMP for the overclocking setting, as for AMD platforms, users can enable DOCP or EXPO (DDR5) in BIOS. Through the function of simple operating settings to achieve overclocking and the best condition of system performance and stability.
The power supply selects XPG VENTO PRO 120 PWM Fan by Nidec as its cooling source to dissipate heat. XPG and Nidec partnered back in 2020 with the new PWM feature, and XPG CYBERCORE is the second collaboration with Nidec. The brand successfully accumulates numerous accolades with patented cooling solutions in various industries, and for the desktop fan field Nidec’s famous GentleTyphoon series has been the sensation to PC users for decades. The fan is famous for its innovative fan blade design, capable of generating high static pressure and airflow, at the same time reduce vibration and operating noise. Its Japanese precision Dual Bearings further boost efficiency and stability, and prolong fan’s life expectancy. Together with the power supply unit, XPG CYBERCORE is built for the extreme performance.
In Windows, click on 'Start' button, then click and open 'Control Panel.'
→ In Windows, please use the traditional view. Click on and open 'System' to display the computer’s basic information, including the total RAM that is installed.
→ In MacOS, click on 'About this Mac' or 'About this Computer' from the Apple menu at the top-left corner. The information about the total memory in the Mac will be provided. (including built-in memory and externally installed DIMM or SIMM.)
→ In Linux, open a terminal window and enter the following command: cat /proc/meminfo to display the total RAM capacity as well as other memory information.
To ensure the power delivery efficiency is up for the expectation, both PCI-E and CPU cables of XPG CYBERCORE offer 16AWG thickness for better power delivery, efficiency and conductivity. The benefit with the 16AWG thickness also ensures full power +12V output, notably for high wattages XPG CYBERCORE 1300W and 1000W. The output current of 1300W is 108.33A, and for 1000W the output current is 83.33A. Better conductivity means less heat expelled from the cables, and safer overall for the system.
In a quiet environment and in specific ambient conditions, a high-pitched sound may occur due to the vibrations and friction of power components on the circuit board. This high-pitched sound is a normal physical phenomenon and does not affect your notebook's safety and performance.
An external memory doesn’t always increase the computer’s performance. But, it’s helpful in the simultaneous multiple operations of more programs or procedures, or beneficial in operating the program that requires a large amount of memory. If the amount of memory that is originally installed doesn’t handle the programs or procedures that are operated, it’s possible to elevate the aspect of performance.
XENIA Xe's RGB LED light bar is used only to notify you that Alexa is active.
For light bar to work, please install Alexa software and turn on light bar selection in Intel® NUC Software Studio.
In many cases, the BIOS or diagnostic program will report the memory bus frequency, which is half of the memory frequency. Because the rate of DDR data transfer (double data transfer) is twice the memory bus frequency. If the bus speed is 800MHz, and DDR3-1600 memory is used, the correct memory operating speed is at 1600.
XENIA Xe's front battery indicator lights only when the lid is closed to indicate battery status.
According to each different BIOS designs of the board manufacturers, memory is shared with the motherboard-
1. Onboard share memory
2. PCIE Device
3. BIOS may need to use 1MB at a minimum.
4. DVMT (The attachment is the DVMT datasheet of the Intel 6 series chipsets product.
Design of memory device varies with different memory capacities, its configuration depends on the best system performance that varies with the motherboard design by different manufacturers.
XPG notebook battery is strictly tested and has automotive power off protection design. To prolong your battery life, we recommend shut down your notebook when not in use to prevent notebook in long time standby situation, or unplug your AC adapter when your notebook is long-time storage not in use. Please prevent constantly changing your notebook under high voltage and avoid storing your notebook in high temperature and damp conditions.
A new Battery Management BIOS is provided for XPG XENIA 15 to optimize your notebook battery power efficiency. Please visit download page to update.
Two DIMMs per channel (2DPC) application technology is different from dual-channel. It is recommended to set the frequency reduction specification to ensure overclocking stability. For example, if you want to go up to 6,000 MT/s you need to buy a DRAM capable of 6,400MT/s. The main reason is the limitation of the motherboard. When supporting memory, the overclocking characteristics can be optimized through the BIOS. However, when four channels are inserted, higher specifications are needed to meet the system requirements of the BIOS, so that the system can run stably even in the overclocked state.
At present, motherboard makers have not yet released the QVL with 4 channels. Therefore general consumers cannot find out the list of four-channel memory from the official website of the motherboard brands.
QVL stands for Qualified Vendor List, which is provided by a motherboard manuafacturer to guarantee that memory can work with the motherboard.
When purchasing DDR5 DRAM, you should understand the motherboard features first and confirm the supported memory frequency by checking the QVL.
After downloading and installing the software, connect the mouse to PC to begin customization with XPG PRIME software.
In order to ensure stable system operation, the system will automatically detect the memory product with the lower frequency specifications and set to run the lower frequency and parameter; the system won't run the memory product with a higher frequency.
XPG PRIME software offers 3 main functions: to set up Lighting, Performance and to determine the power usage preference in Power Status tab.
- User can quickly change the lighting effect with presets, or advance to more detailed settings such as individual lighting sectors and brightness on the mouse.
- In the Performance tab, user can decide the number of DPI steps, and the sensitivity of each DPI step. Angle snap, debounce time and polling rate are all available for user to customize.
- In the power status options, gamers can adjust the idle interval time before the mouse enters the sleep mode. The low power warning setting allows gamers to set the percentage of the remaining power themselves so that when the power is in the low power status, the DPI button will be displayed with a red light.
When RGB memory is coupled with non-RGB memory, the system can work normally; but, XPG RGB AP can’t be installed. Once it’s installed, the software will display not an RGB DRAM.
At the bottom of mouse, right next to the sensor there is a switch that user can choose the connection mode between 2.4G wireless, Bluetooth, or Off. The wireless 2.4G dongle embedded inside the mouse needs to connect to the PC.
1. If it is a newly purchased memory, confirm that your previous memory and the newly purchased memory are of the same brand, frequency, capacity, and number of particles. If they are the same, we recommend that you try to insert the memory in another computer or other slots on your motherboard. If the problem persists, it may be a memory failure. It is recommended that you send the product through the original purchase merchant or the nearest ADATA authorized service center for repair.
If the new memory does not belong to the same brand as before, you can consult the memory compatibility of your computer manufacturer.
2. If there is a fault in normal use and it can be repaired through the service center, you can contact your purchaser or our service center for repair.
If it is inconvenient to send repairs to the service center, you can apply for repair online on XPG’s official website.
After completing the application, please follow the instructions to properly package the product and return it to the designated address. We will carry out the repair process for you as soon as possible after receipt.
The service center only provides service for the repair of products (the appearance of the product must not exhibit external damage, and the stickers must be intact). The warranty scope and authenticity of the product will be determined by the original factory based on the physical product received. It is recommended that you file a clear picture of the front and back of the product before sending it for repair.
【Important reminder: If your memory needs to run dual channels, please send both modules together for repair to facilitate dual channel testing.】
On top of the mouse you can find a triangular button that can be used as DPI button, but there are more:
Preset 6 DPI steps from 400, 800, 1600 ,3200, 6400, and 16000 (max). When switching between each step, a different indicating color serves as a visually notification. And when connected to XPG PRIME software, the lowest DPI step can be adjusted to 100. The number of DPI steps can also be changed ranging from one to six, depending on your preference and gaming habit.
CPU-Z can be recognized as one of the most classic computer system information software, the relevant information about testing current computer device:
Type: Types of the Memory Device
Size: Total memory capacity that is installed on the computer.
Channel: The number of channels that are used in the operations of the Memory Device. In the example, the number of channels is 4, which means that the system will combine the bandwidth of the 4 memory devices to increase transmission performance.
Tinings Block
DRAM Frequency: Operation speed of Memory Rank.
FSB and DRAM ratio: The ratio of front side bus (FSB) frequency and DRAM Frequency
RAM Timing Benchmarks (CL, tRCD, tRP, tRAS, tRFC, CR): Each of the 6 different benchmarks individually represents the frequency cycle required for different DRAM operations.
ALPHA mouse battery consumption is calculated based on an average time of continuous drain with LEDs turned on showing a standard colored effect. That translates to charging once to twice a month with average daily use, depending from the effect used. When LEDs are turned off, the 900mAh rechargeable lithium battery can reach over 120 hours of continuous operation in optimal environmental conditions.
Steps of the Testing Method without Booting:
1. Verify that the system requirements specifications (SRS) are mutually supportive. (CPU, motherboard, DRAM, and power supply)
2. Verify the power connection, if there’s no electricity, it may be the broken power supply or a short circuited protection board.
3. If there’s a BIOS warning sound after system startup, please refer to the BIOS manufacturer to fix the errors.
4. If the computer is power-connected without a BIOS warning sound, please replace the CPU, MB, memory in order until system startup.
When setting all LEDs on XPG ALPHA to white color at its maximum luminosity, all segments of a single LED are turned to maximum, which inevitably consumes 2-3x times more than standard operation in color mode or about 5x times more consumption than keeping LEDs off when operating in wireless mode.
If you install a variety of different brands of RGB control software on your PC, it may cause the software SMBUS command resources to conflict, resulting in the failure to control the lighting effects normally. It is recommended that you just install one RGB control software for your PC.
To switch to motherboard software for the ARGB lighting control, long press I/O panel’s LED button for 5 seconds and wait for a blink. Press again to switch back to I/O panel control.
The occurrence of the blue screen may be resulted from many factors; the hardware may affect the parts including RAM, motherboard, hard disk and power supply. To verify whether or not it is a problem RAM, it’s recommended to use the RAM test software, Memtest86+. If there is a red error message, it’s confirmed to be the DRAM problem, please contact the customer service agent.
After confirming the installation with the memory device that is suitable for the system, please follow the steps as below:
1. Shut down the computer and unplug the power plug.
2. According to your motherboard layout, re-insert the memory device with the maximum capacity to the 1st socket, then re-insert the memory device to with the smaller capacity in a decreasing order. Ensure that the memory module has been installed correctly, then align each DIMM with the connector slot by aligning the notch in the DIMM with the key in the connector. Then, steadily and firmly push the memory device into the slot until locking to the position.
3. Make sure that all cables in the computer are connected correctly. Make sure required power connector is well-connected to the motherboard, and avoid any cables that connect to the hard disk have been disconnected by accident.
4. After the recommended memory device is installed correctly, but the laptop won’t re-boot or identify the memory device, it may be necessary to download the latest BIOS from the laptop manufacturer’s website.
XPG XENIA 15 KC has a battery protection design to prevent the loss of battery life over time due to constant charging and discharging cycles, in order to help lengthen the lifespan of your notebook.
In case the adapter is being plugged in when battery capacity is already over the default 90% value, the system will prevent charging the battery further. If you want to charge your battery up to 100%, please plug your AC when the battery is below 90% capacity.
Users can set different battery charging limits for their notebook by using Intel® NUC Software Studio that comes preinstalled with all Xenia 15 KC notebooks.
If your notebook stops charging even when the battery has fallen below 90%, check the battery charge limit setting in the Intel® NUC software studio as indicated in the sample picture below for any manual setting change.
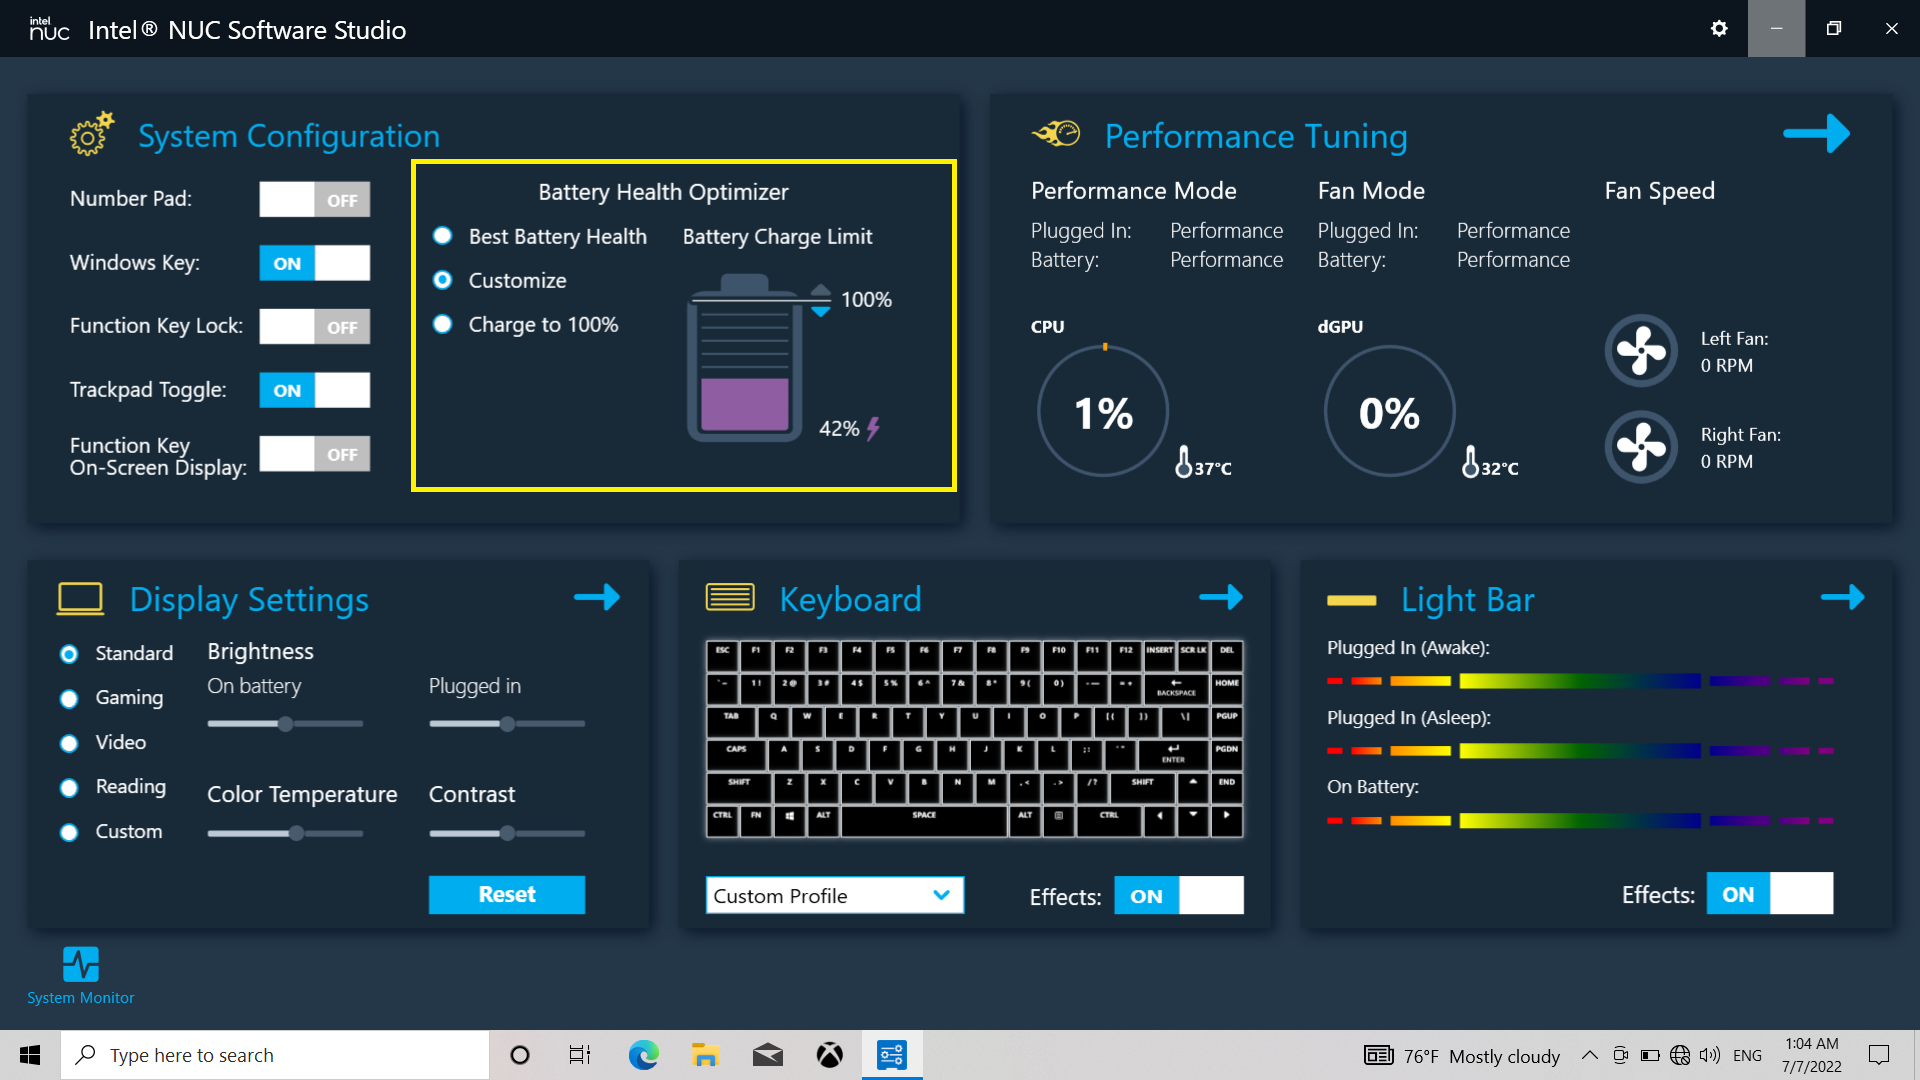
If you have uninstalled Intel® NUC Software Studio, you can still download it separately from XPG Xenia 15 KC download page.
1. Confirm System Requirements Specifications (CPU, motherboard and memory device)
2. For the Intel platform, please choose the option of BIOS load XMP.
3. For the AMD platform, please choose the option of BIOS load AMP.
(Motherboard factories don’t always give the same name to the overclocking options. Examples are as below: MSI DDR4 named by A-XMP & ASUS is D.O.C.P.)
Please follow the steps below to upgrade your XENIA Xe to Windows 11.
1. Check your BIOS version first. If your current BIOS version is under BCTGL357.0064, please upgrade your BIOS version to 0064. You can check your BIOS version by pressing F2 during boot-up.
BIOS 0064:
https://bit.ly/Xenia_xe_bios_update_v_0064
2. When you successfully upgrade your BIOS to version 0064, please download and upgrade your BIOS to BCTGL357.0071. The BIOS version 0064 must be installed prior to upgrading to version 0071.
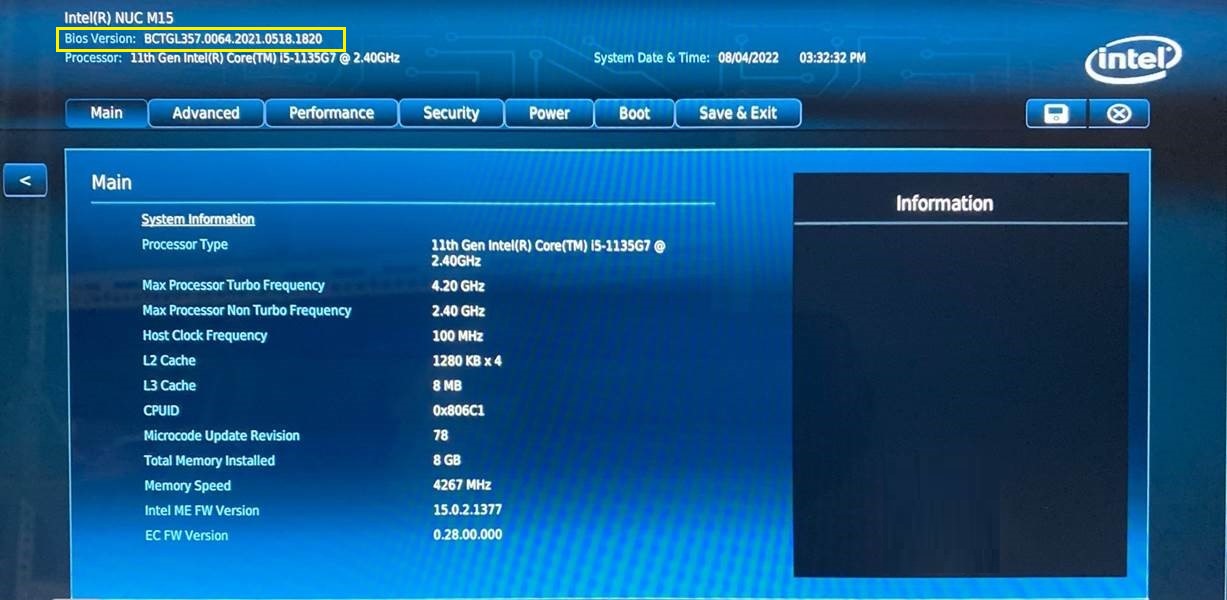
BIOS 0071:
https://bit.ly/Xenia_xe_bios_update_v_0071
3. After you upgrade your BIOS from 0064 to 0071, you can now upgrade your XENIA Xe to Windows 11.
Please follow the steps as below to verify -
1. Update the system to the latest BIOS version.
2. Install DRAM module.
3. For overclocking products, please set BIOS to XMP, EXPO or DOCP .
4. Run Memtest86+ software (Memtest86 + (http://www.memtest.org/))- A free RAM test software.( http://www.memtest.org/)
5. When the test result of 1pcs is normal, install the dual channel module and run the test.
Your motherboard’s BIOS or the RGB software version may need to be updated:
To fix the problem, perform the following actions:
1. Download/update the latest BIOS for your motherboard
2. Go to the software or download area of your motherboard’s webpage and download the latest version of the RGB software
3. Install as the system administrator
The following RGB software are supported:
ASUS Armoury Crate (Aura Sync)
MSI Center(Mystic Light)
Gigabyte Fusion APP
ASRock Polychrome SYNC APP
Please first confirm whether you have set the SSD as a virtual disk (Control Panel>System and Security>Storage Spaces). Toolbox is unable to detect a virtual disk. You can delete the virtual disk in Storage Spaces or format and initialize the SSD in Disk Management. Toolbox will then recognize the SSD.
Please find the recommended installation instructions here.
The image is not permanent. Please refer to the official Intel® NUC laptop image retention removal guide for help.
Please use the built-in Intel NUC Software Studio and disable the “Lock When Not Present” function, then it will never enter sleep mode.
First, please refer to your system's user manual to ensure the issue is not related to the host device or hardware. We recommended doing some basic software-level troubleshooting. Use SSD Toolbox to check your SSD status, then go to "Utility" in the left sidebar and select "Firmware Update" to update. Once the update is complete, restart your system—this can help resolve intermittent issues like these.
Important: Before updating the firmware, be sure to back up your valuable data and keep the system powered on throughout the update process to avoid update failure.
No, hot-swapping is not supported. If you need to adjust the fan arrangement or change the number of fans, always turn off the power first. Failing to do so may result in damage.
Ensure all fans are fully assembled before connecting the power and LED to the motherboard. Always turn off the PC power before making any connections to prevent potential issues.
Performance wise, they are identical with different cabling and packaging.
The 12V-2x6 cable is an updated version of the 12VHPWR cable, but both share the same design and power delivery, supporting up to 600W. They are fully compatible with each other, meaning that no matter which cable comes with your PSU, it will still support the latest high-power GPUs.
The power supply units that have DC-DC circuit design are XPG FUSION, XPG CYBERCORE Series, XPG CORE REACTOR Series, and XPG PYLON.
The power supply units that utilize Japanese Capacitors are XPG FUSION, XPG CYBERCORE Series, XPG CORE REACTOR Series, and XPG PYLON.
The recommended course of action is to:
1 – Make sure that the cable is properly seated on both ends and connectors are properly locked and aligned. Try disconnecting and reconnecting the cable, making sure that the cable is twist-free and has a natural loop without folding or straining the cable.
2 – Try a different PCIe slot and double-check that the slot you are using is enabled from BIOS setup for enough PCIe lanes for your device. Also, check also if there is a PCIe transfer mode option to ensure that the proper generation of PCIe version has been selected that satisfies both your device and motherboard.
3 – Look for more recent Bios updates from your motherboard vendor.
4 – Update chipset and GPU drivers to the latest available and make sure your OS is up-to-date and not pending any updates in the background.
5 – If problems persist, please contact XPG Support at xpg.com/en/support for further instructions.
The riser cable included in some configurations of Invader X is made of high-quality materials and tested to withstand transfer rates of up to 16GT/s as per PCIe Gen4 specifications.
While XPG tested a variety of combinations of GPUs/motherboards without issue, we have seen limited reports of occasional issues with specific combinations and vendors.
Those issues may include GPU cards not being recognized or occasional freezes. In particular a limited number of AMD Ryzen motherboards on B550, B650 and A620 Series Chipsets have seen issues when paired to higher end last-generation GPUs, due to design choices and tolerance levels of some PCIe connectors.
The software requires Windows 10 and above to run.
Please try the following steps in order:
1. RESET PRIME to Default
Move your mouse to the top-right corner of XPG PRIME. Hover over “Hi, Guest ” to reveal the “Reset” function. Click the Reset button to reset PRIME software to default settings.
2. RESET keyboard or mouse to Default
Keyboard: Hold FN + ESC for 5 seconds.
Slingshot Mouse: Hold Forward Button + Backward Button + DPI Button for 5 seconds.
3. Enter Settings menu and check both product firmware and PRIME versions. If either firmware is not the latest available version, please UPDATE to the latest version.
4. If the problem remains, please Contact us and provide the following information:
Product Firmware and PRIME versions.
Photos/Videos of the problem.
How to reproduce the problem (scenario or steps).